
Get more growing days—if not weeks!
Get more growing days—if not weeks—by building a hoop house! This is a very inexpensive way to keep your crops going during colder weather for a longer, biggest harvest! What is a hoop house? How do you make a hoop house? Find out in this article!
First, a little background. I live on a 5-acre farm with my family in mid-Michigan and have been selling produce— including heirloom and uncommon varieties—at farmers’ markets since I was a child.
Back then, we had a greenhouse heated with kerosene. It shares a wall with the front barn, is close to the water pump, and is very much a part of the barnyard. There we start all of the seedlings that get transplanted into the market and household gardens, from early spring lettuce to winter squash.
Read Next
A greenhouse’s usefulness is limited to March through May, when we are starting our garden transplants that are grown outside.
However, we realized about 7 years ago that we could significantly expand our food options in the darker fall and winter months with a hoop house. Imagine: luscious, fresh, live greens every winter day!
 Photo: Leah Smith
What is a Hoop House?
A hoop house (also called a polytunnel or hoop tunnel or high tunnel) is simply heavy-duty plastic stretched over arched steel hoops. It’s not heated; there’s no artificial lighting; it’s an inexpensive but very practical way to trap the sun/solar rays to increase the heat inside as well as provide shelter from frost and cold winds.
The easiest way to make a small tunnel is to put metal posts into the ground along the sides of your garden bed; then slide segments of PVC pipe in one post and arch over the garden bed to the opposite post, then stretch the polyethylene plastic across the arches. You can also set up your hoop over a raised bed, say 4 hoops per bed.
Building a Hoop House
You can buy a kit, or you can head to your nearest home improvement store to get most of the materials.
Materials:
- 10 x 20-foot garden bed
- 10 4-foot pieces of rebar, concrete reinforcement bar
- 2 2-foot pieces of rebar
- 7 10-foot foot pieces of ½-inch schedule 40 PVC pipe, cut into 22-inch lengths (10 22-inch pieces)
- 2 50-foot lengths of very strong twine or thin rope
- 2 6-foot lengths of rope
- 20 8-inch zip ties
- 32 x 15-foot piece of greenhouse-grade plastic sheeting (available online)
- 10 Large binder clips (available from office stores)
To build:
- Drive the 4-foot lengths of rebar 2 feet into the ground in two parallel lines about 8 feet apart. Within each row, the posts should be about 5 feet apart.
- Slip a 22-inch sleeve of PVC pipe over each one of the rebar posts. Use the 10-foot lengths as tunnel hoops by slipping one end over the remaining 2 inches of rebar projecting above each sleeve and then bending it over to the corresponding rebar in the other line of posts. It will take some strong bending in order to prong it onto the post. The highest point of the hoop should be about 5 feet.
- Take a zip-tie down to the base of the rebar posts and loop it around. Slip another zip-tie into the loop you just made, but don’t cinch it tight. You are creating one in a series of loops that serve as anchor points for the structure that will keep the plastic roof and walls in place. Make loops at the base of all ten posts.
- Take two 2-foot rebar posts and pound them into the ground about 5 feet out from either end of your hoop house, and tipped back at an angle from the structure. Leave 6 inches showing, and put something luminous on the end, like paint, so you can see them.
- Take a piece of cord or twine and tie it to one of those ends. Loop it around the first PVC pipe arch at the highest point in the center. Continue looping it around each of the five arches. Secure it to the second rebar stake at the opposite end, with no slack. You are creating a ridge pole to prevent sagging.
- Drape your plastic sheeting over the arches and center rope beam.
- To secure the plastic sheeting, take one of the 50-foot lengths of rope and knot it around the zip-tie at one end of your hoop house. Thread it over the hoop and around the zip-tie on the second post on the opposite side. Continue staggering the rope in a zig-zag pattern until you reach the other end of the hoop house. Take the second 50-foot length of rope and stagger in the opposite direction to create a crisscross over the center line. This is like lacing up a shoe.
- Gather the excess plastic sheeting on the ends and bunch together, and bind with one of the 6-foot lengths of rope.
- To let out excess heat, roll the plastic inward (to prevent rain from accumulating and weighing it down). Secure the roll-up on each side by clamping the roll tightly with binder clips, five on each side. Roll it down to keep the heat in. Keeping the roll-ups in place may take some trial and error, but persist!
Voila! Private hoop house for $75 and an hour of your time.
Every hoop house is a little different. Our hoop house is 14 feet wide by 20 feet long, it is like a giant row cover that you can walk into. We followed Eliot Coleman’s design from his book Four-Season Harvest (Chelsea Green Publishing, 1999). From a local growers’ supply store, we bought six 10-foot-tall metal hoops; these are attached to the hoop house frame on the long sides.
The house is covered in polyethylene plastic. The long sides have skid bases that rest on 2x8-foot pine boards that act as rails. These are placed on the ground on their narrow edges and attached to metal pipes driven into the ground with a sledgehammer (be sure to protect the boards’ ends from the hammer blows).
This skid/rail design allows the hoop house to be moved forward and back over a 14x40-foot garden plot, covering one of two 14x20-foot plots at any one time.
Unlike a stationary hoop house, a mobile one increases the flexibility and variety of your planting schedule, and it puts more land into production. In an ambitious home plot, a smaller-scale hoop house would boost winter fare.
Add Cold Frames
We further increased our production and cold weather immunity with cold frames inside the hoop house. (Any cold frame model will work.) See how to make a cold frame step-by-step.
In September, when Michigan gardeners think about putting the garden to bed, we are direct-seeding and putting month-old transplants into the cold frames in the open (uncovered) plot. When the seeds have germinated and put on good growth, we push the hoop house over the cold frames. With the end doors closed, the hoop house and cold frames together protect our plants from October through March, even in the coldest weather.
As it gets warmer, the cold frames are moved to the uncovered plot. There the first lettuce crop of the year can be planted in the ground in March instead of May, with the protection of the cold frames. The hoop house remains in place. This way, while you are still harvesting lettuce from one plot, you can be growing more lettuce in the other plot, avoiding any gap in your lettuce supply.
Hoop House Storage
Through the summer we allow our hoop house to rest, as we don’t want to have to supply it with water. This does not have to be the case for your hoop house. The soil under a hoop house can be used for food production in summer and be very productive, as long as you water it.
Our cold frames are stored during the summer, when they are not needed, to protect them from the elements. The end doors of the hoop house are removed and stored as well.
As we don’t use our hoop house during the summer months, we cover it with tarps; protection from the sun and other elements helps to prolong the life of the plastic (hoop house plastic may have to be replaced if it becomes damaged or degraded).
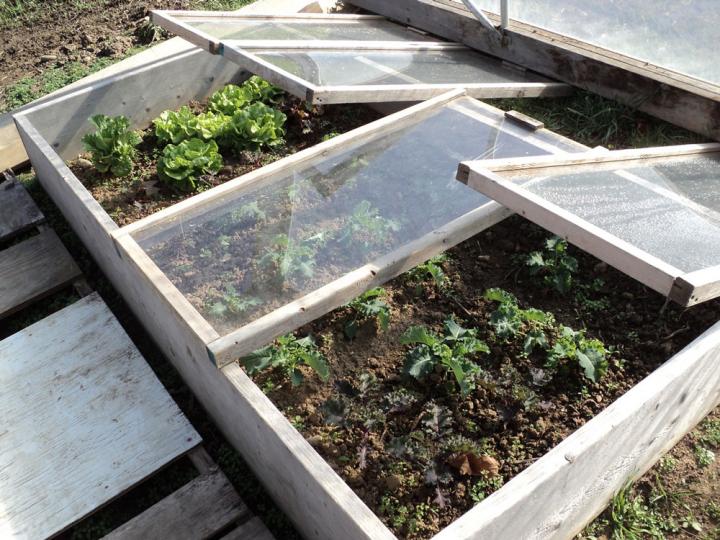 Photo: Leah Smith
Hoop House Harvest
Our hoop house has been a dietary and culinary joy.
- From early November to April, we make salads not just of lettuce, but with exciting mescluns, sweet baby kale, and tangy arugula, for example.
- We are also growing varieties of lettuce specifically bred for winter growing, such as ‘Winter Density’ Bibb romaine and ‘Winter Marvel’ butterhead.
- We have also been introduced to new greens, including intrepid claytonia (aka miner’s lettuce or winter purslane) and mâche (aka corn salad or lamb’s lettuce), which thrive in the winter months—and year after year: If let go to seed before tilled under, they will keep on growing and reseeding themselves.
- We have also grown spinach, scallions, radishes, parsley, and dill in the hoop house—and too much more to mention.
A hoop house/cold frames system requires investment, yes, but also organization and planning; you have to reset the planting calendar and think of planting times in a completely different way. Simply built, passively solar-powered, and reliant on only natural rain (thanks to its mobility), our hoop house has required minimal work—yet its returns have been plentiful. With no cold weather allowed!
Read more about hoop houses in our article, “Is There a Greenhouse in Your Future?”
The Editors


ADVERTISEMENT