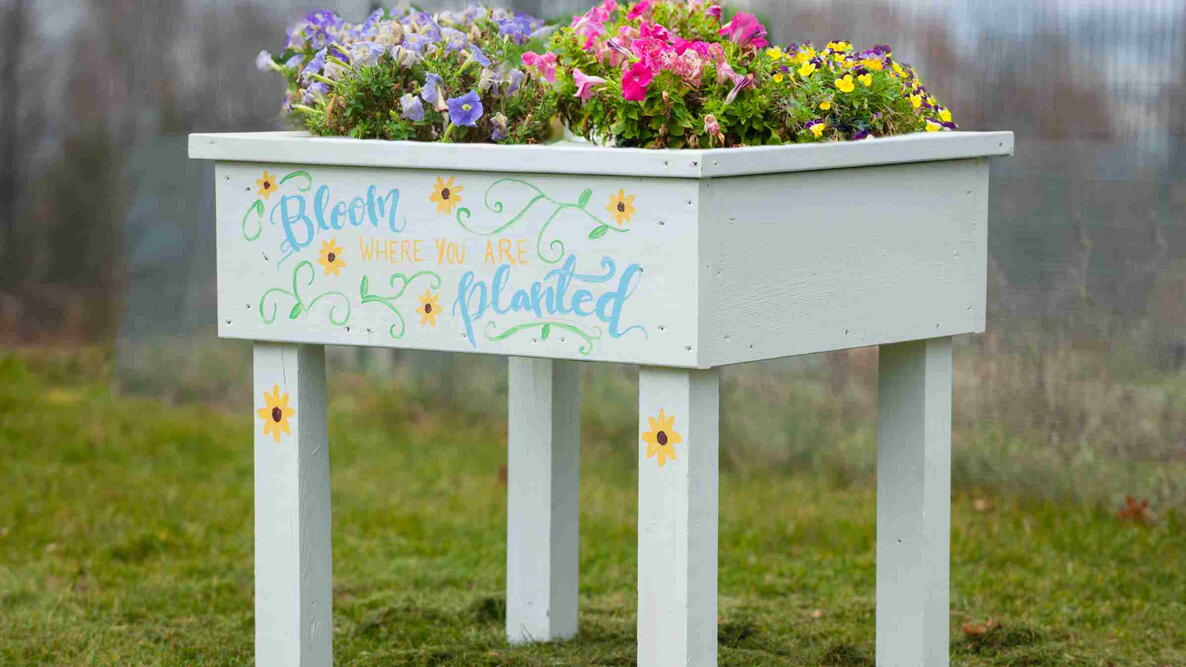
Caption
Gardening doesn’t have to be back-breaking—this DIY elevated bed brings blooms to waist height.
Want to grow flowers, vegetables, or herbs without bending or kneeling? This beginner-friendly DIY elevated garden bed is easy to build with basic tools. It stands on four wooden legs, bringing a 3-foot-square planting box to a comfortable working height for planting, weeding, and harvesting.
In this guide, I’ll show you how I built mine using common lumber, with a complete cut list, measurements, and step-by-step photographs. I painted the finished bed white and filled it with flowers, but you can also grow herbs and compact vegetables, such as lettuce, provided the bottom is securely supported and properly drained.
Before You Build: Size, Height, and Location
The bed in this project is 36 inches square, with four 36-inch wooden legs attached flush with the top of the bed frame. That puts the top of the planter at approximately waist height for many gardeners. Before you start cutting, think about your own comfortable working height and whether you can reach the center of the bed. If you want to change the dimensions, adjust the cut list and support design accordingly.
Choose a level, sturdy location with the sunlight your plants need. This may be a modest-sized planter, but it will be very heavy when filled with moist soil. It’s best to assemble it near its permanent location, or move it before filling it. Make sure it stands securely without rocking.
Tools and Materials for an Elevated Garden Bed
You don’t need fancy woodworking equipment for this DIY garden bed. The cut list below is for the 36-by-36-inch version shown in Daniel’s photographs. Have the lumber cut at the store if that’s easier, and double-check all measurements before assembly.
Tools
- Pencil and tape measure
- Carpenter’s square
- Circular saw (a miter saw is especially useful for the angled trim cuts)
- Cordless drill and driver bits
- Staple gun and staples
- Paintbrush
- Eye protection and appropriate safety equipment
Safety tip: Follow the manufacturer’s instructions for your tools, wear appropriate protection, and get help lifting or turning the frame if needed.
Other Supplies
- 3-inch exterior-rated wood screws (the original project also describes galvanized nails as an alternative)
- One 36-by-36-inch piece of sturdy, water-permeable landscape fabric
- Exterior paint or another finish suitable for an outdoor planter, used according to its label
- Growing mix and plants, once the finished structure has been checked for stability
Lumber Cut List
- 2 pieces: 36-inch-long 2-by-12 boards
- 2 pieces: 33-inch-long 2-by-12 boards
- 4 pieces: 36-inch-long 4-by-4 posts (legs)
- 4 pieces: 38-inch-long 2-by-4 boards (top trim)
- 3 pieces: 33-inch-long 2-by-4 boards (bottom supports)
- 2 pieces: 26-inch-long 2-by-4 boards (end supports)
Wood choice: Naturally rot-resistant woods such as cedar and redwood are good options outdoors. If you use another type of lumber, choose an appropriate exterior finish and allow it to cure fully before filling and planting.
How to Build an Elevated Garden Bed: 7 Steps With Photos
This project starts with a square wooden frame, then adds legs, trim, and a supported planting area. Follow the photos as you work. Keep the construction square and the connections secure at every stage.
Step 1: Build the 36-Inch Bed Frame
Start by making the square planting box from the 2-by-12 boards. The two 33-inch boards fit between the two 36-inch boards to form a frame that’s approximately 36 inches square on the outside.
- Lay out the four boards on a level work surface, with the shorter boards between the longer ones.
- Use a carpenter’s square to check the corners.
- Fasten the corners securely with exterior-rated screws.
I prefer a cordless drill and screws for this job. The original project used 3-inch fasteners; if you substitute nails or a different type of lumber, make sure the connections are appropriate for the weight the finished bed will hold.

Step 2: Attach the Four Legs
The 4-by-4 posts turn the planting box into a table-height garden bed. Each leg is 36 inches long; attach its top flush with the top edge of the planting-box frame. This alignment matters because it sets the finished working height.
- Turn the wooden frame upside down on a flat surface.
- Position a 36-inch 4-by-4 post in each corner, keeping its top flush with the frame’s upper edge (now facing the floor).
- Secure each leg firmly with exterior-rated fasteners, checking that it sits square against the frame.
- With help if necessary, turn the assembly upright and check that all four legs stand evenly and that the frame does not wobble.


Step 3: Cut and Assemble the Top Trim
Four 38-inch 2-by-4 boards form the trim around the top of the planter. It gives the bed a tidy finish, although these angled cuts take a little extra care.
- Mark a 45-degree angle at each end of all four trim boards, following the photos.
- Cut the angles carefully. A miter saw makes this easier, but a circular saw can also work.
- Arrange the boards into a square trim frame and check the corners.
- Fasten the pieces together securely.
Don’t worry if your trim corners aren’t cabinetmaker-perfect. A little rustic charm looks right at home in the garden!


Step 4: Fasten the Trim to the Planter
Set the finished trim frame on top of the elevated bed, align the corners, and secure it with exterior-rated screws. The trim gives the planter a polished edge.

Step 5: Install the Bottom Supports
An elevated garden bed needs to support its growing mix above the ground. In this photographed design, a series of 2-by-4 crosspieces supports the landscape fabric used to retain the soil.
- Attach the three 33-inch 2-by-4 boards across the underside of the frame, spacing them evenly.
- Fit the two 26-inch boards at the ends between the legs.
- Fasten every support securely and check for gaps, movement, or weak connections.
Samantha’s original build spaces the supports about 3⅞ inches apart. Use the photograph to understand their placement, rather than relying on the measurement alone.

Step 6: Line the Bottom With Landscape Fabric
Lay the 36-by-36-inch piece of water-permeable landscape fabric over the crosspieces and staple it securely in place. The liner helps keep growing mix from washing through while allowing water to drain.

Important note about supporting the soil: This planter uses landscape fabric over wooden cross supports, as shown in the photos. Iowa State University Extension recommends a sturdy base with drainage holes beneath the fabric. Because wet soil can be very heavy, make sure the bottom is adequately supported before filling the bed. For added durability, consider installing a properly supported, drainable bottom beneath the fabric. Do not rely on fabric alone to bear the weight of the soil.
Step 7: Paint, Fill, and Plant
Paint or finish the outside of the planter to help protect the wood from the weather. I chose white and added a few painted flowers for a personal touch. Follow the finish manufacturer’s instructions and allow the coating to cure fully before filling the bed.
Once the planter is stable and you’ve checked the bottom for adequate support and drainage, add a suitable growing mix and your plants. There’s something especially satisfying about filling a garden bed you built yourself!


What Can You Grow in an Elevated Garden Bed?
This type of bed is especially handy for crops you tend often: think lettuce, kale, compact herbs, and bush beans. Annual flowers are another lovely option. Depending on the variety and available rooting depth, you may also be able to grow compact peppers or other container-friendly vegetables.
Choose plants according to the bed’s sun exposure and the depth of the growing mix. A planter with legs doesn’t automatically keep out insects or wildlife, though raising plants off the ground may make some ground-level pests less troublesome.
Soil, Watering, and Care Tips
- Use a suitable growing mix. Choose a well-draining mix intended for raised containers or planters. Avoid filling the bed with dense garden soil that may compact and add unnecessary weight.
- Plan for drainage. Excess water must be able to escape, and the entire bottom must be properly supported. Check the structure after watering, not just when the mix is dry.
- Check the amount of soil needed. Measure the inside length, width, and planting depth before using our Soil Calculator. See also Choosing the Best Soil for Raised Garden Beds.
- Water regularly. Elevated planters may dry out faster than beds in the ground, especially in warm or windy weather. Check moisture with your finger rather than watering on a fixed schedule.
- Keep it in one place once filled. A bed holding damp growing mix is heavy. The design shown here doesn’t include wheels or a mobility system.
- Inspect it each season. Check fasteners, the wooden supports, fabric, wood condition, and stability before planting again.
The best part of this project is being able to tend your plants without dropping to your knees. With the frame securely supported, drainage accounted for, and plants suited to the bed’s size, you can enjoy a productive little garden at a comfortable height.
Project by Samantha Johnson. Photos by Daniel Johnson.
Frequently Asked Questions
-
What’s the difference between a raised garden bed and an elevated garden bed?
A traditional raised garden bed is a planting area built up from the ground. An elevated garden bed stands on legs, lifting its planting area closer to waist height. That makes everyday tasks easier for gardeners who prefer less bending or kneeling.
-
How tall should an elevated garden bed be?
It depends on the gardener. This project uses 36-inch legs aligned with the top of the planter frame, putting the working edge at roughly waist height for many people. Before you build, consider your height, reach, and whether you’ll work standing or seated. The best height is one you can comfortably use.
-
How deep does the soil need to be?
Many herbs, leafy greens, and compact vegetables can grow in about 10 to 12 inches of soil, although some crops need more root space. The 2-by-12 boards in this project provide roughly that depth, leaving room at the top for watering. Choose plants that suit the available space.
-
Does an elevated garden bed need a bottom and drainage?
Yes. It needs a secure, load-bearing bottom and a way for excess water to escape. This project shows fabric over wooden cross supports; Iowa State University Extension recommends a sturdy base with drainage holes and a fabric liner. Never rely on landscape fabric alone to hold wet soil.
-
What wood should I use?
Choose lumber suitable for outdoor use. Naturally rot-resistant cedar or redwood are good options. Whatever wood and finish you choose, follow the product instructions and inspect the bed over time for weathering or decay.
-
Can I put wheels on this elevated garden bed?
The design shown here isn’t built for casters. Adding wheels would change how it bears weight and could affect stability, especially when the bed is filled with wet soil. Don’t add wheels without redesigning and verifying the supports and load capacity.

More Like This

Comments