
How to Dry Your Garlic for Homemade Garlic Powder!
The flavor of homemade garlic powder is unbeatable—it truly tastes like garlic that has just been picked from the garden (and nothing like that prepackaged stuff). Plus, it’s ready to be used all year long! See how to dry garlic to make your own garlic powder.
Reasons to Make Your Own Garlic Powder
A lot of commercial garlic powder is pretty bad in terms of quality; it doesn’t even smell or taste like garlic and can have an unpleasant aftertaste. Some producers don’t even bother removing the skin plus there isn’t FDA regulation around commodity spices so it’s difficult to know what’s truly inside the bottle. Unless you buy local garlic, many of the garlic bulbs sold in stores have gone past their peak (rubbery or soft) and have lost much of their medicinal value.
Truly fresh garlic is pungent, white, hard, and full of a juicy liquid. One way to maintain not only garlic’s flavor but also its healing powers is to dry it and make it into garlic powder! There are so many ways to use garlic powder, from shaking the seasoning into salad dressings and soups, onto potatoes, and even over popcorn.
Read Next
Dried garlic powder has a different purpose than raw garlic; it’s mellower and milder to enhance flavor versus the sharp taste of garlic in a main dish. Ideally, you could grow your own garlic, as it’s easy to plant your own bulbs in the fall. Otherwise, we do recommend buying local garlic bulbs for the freshest flavor if you can.
For those who wish to garden, garlic bulbs are popped into the soil in the fall and harvested in the summer once the leaves turn yellow-brown. See how to prepare your soil in our Garlic Growing Guide.
Making Garlic Powder in the Dehydrator
At harvest, I generally pick about eight bulbs of garlic at a time, bundle them tightly together, and tie them with string. I then hang the bundles for two to four weeks in a shady, airy place to begin to dry.

Whether you grow your own or buy your garlic cloves, the first step to making the powder is to separate all of the cloves. This can be a messy job, so do it all at once!

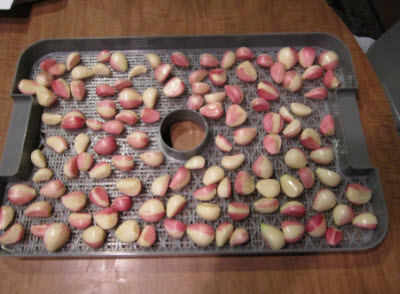
After separating the cloves, I cut the tops and the bottoms of the cloves and try to tear a strip or two of the skin.

Placing these cloves in a dehydrator tray, they are put at a low temperature (below 115°F/46°C) overnight. This will help to loosen the peels and aid the next process.
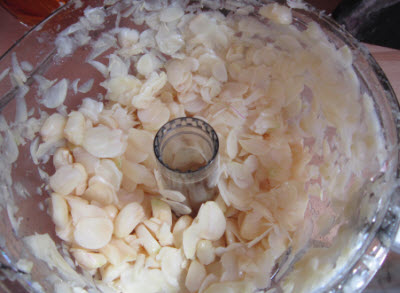
Day number two consists of peeling all of the cloves and then slicing them up in a food processor.

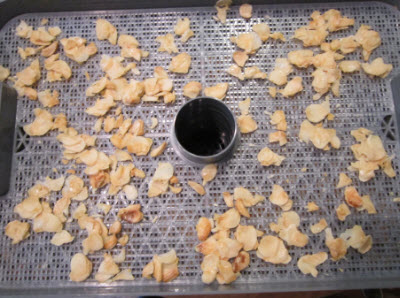
Back into the dehydrator they go for six or seven days. Again, keep the temperature below 115°F/46°C as this will help the garlic to maintain its healing properties.

Once the chips have cooled, they can be put in a tight jar until you have time to complete the process.
When you are ready to make the powder, put the chips in a blender (not too many at a time) and hit the “chop” button. Wait about a minute after processing before opening the blender, as there will be lots of powder floating at first. I then put the powder through a strainer so that the ultimate product is fine. The larger chips just go back into the blender.

Place into jars and seal. The flavor is unbeatable—it truly tastes like garlic that has just been picked from the garden. But now it is ready to be used all year long!

Making Garlic Powder in the Oven
Conversely, you can also make garlic powder in your oven. To do so:
- Preheat your oven to 175 degrees F.
- Line a baking sheet with parchment paper, then place the sliced garlic on top.
- The garlic is ready after anywhere from 1 to 2 hours. Test it by seeing if a piece “snaps” when you break it in half.
- Then, you need to let the garlic cool completely.
- Grind it into a powder by using a high-speed blender or coffee grinder.
Of course, garlic powder not only adds flavor to your meals but has some glorious health benefits, too. Learn more about the healing benefits of garlic.
Celeste Longacre


ADVERTISEMENT
I do grow my own hardneck garlic but have yet to try making my own garlic powder. I do have a dehydrator so I will try that method. And here's a tip for peeling garlic cloves. Using 2 stainless steel mixing bowls, place up to about 10 unpeeled cloves in one of the bowls. Place the second bowl upside down on top of the bowl with the cloves, hold the rims of the two bowls together and shake vigorously. Voila! Garlic cloves peeled and when you remove the peeled cloves, all the skins are left in the bowl for easy disposal.
I peel & slice mine like tater chips and then put them in a dehydrator. After a few days when they are dried enough, I run em through a coffee grinder. Far better than any store bought.
I wish you would include a way to process using a stove (or air fryer?) - not everyone has a dehydrator…. Thoughts? Thank you!
Hi, Cindi. If you want to use your oven, preheat it to 175 degrees F. Line a baking sheet with parchment paper, then place the sliced garlic on top. The garlic is ready after anywhere from 1 to 2 hours. Test it by seeing if a pieces “snaps” when you break it in half. Then you need to let the garlic cool completely. Grind it into a powder by using a high-speed blender or coffee grinder.
Dehydrators can be gotten for really cheap these days. The electric or gas expense of an oven can end up higher than the dehydrator itself.
Thx CW: it’s less a matter of expense & more a matter of countertop or cabinetry “real estate” & how much I’d use it otherwise. I hoped there is a way to dry the garlic w/ things like ovens that everyone has
Celeste, will you please address if garlic can be oven dried & if so, how?
Hi Cindi ! This is something so easy to do during the summer or on a pretty warm day. I rinse off my fresh herbs, remove the stalks (since they retain a lot of moisture), carefully pat them with paper towels to remove more of the moisture, let them air dry for 30 minutes on a paper towel, and then place them onto a metal cookie sheet lined with aluminum foil. Last step, put them in a hot car with the windows rolled up. The herbs usually dry up pretty well within 2 days and they look beautifully green and fresh. All you have to do is crush the leaves and store in airtight jars. I refill previously purchased jars that have had herbs in them and they already have labels. I have done this with parsley, oregano, basil leaves, and celery leaves. It works great ! Did you know that you can also bake cookies in your very hot car ... only do this on a very hot day with no humidity.
Hi P. Dyer & thank you! I definitely live in a hot, dry summer climate, & while I could see doing the car-dry w/ more fragrant herbs, trying that w/ garlic over several days might be too much “fragrance” for a car.
Do you think just setting the garlic on a sheet pan outdoors for several days in a dry heat would work?
I believe you can create your own dehydrator with some vented trays or racks, a hundred watt incandescent light
bulb and a foil tent from your own household materials. DO NOT USE HALOGEN, FLORESCENT OR L.E.D. BULBS!! SAFETY FIRST!! Look up instructions on Google or other search engines for better directions. If dehydrating is not something you do frequently then you can disassemble after drying your garlic. NOTE: timing is the key to success in drying garlic.
P.S. I only planted garlic once - it continues to come back to my garden every year, spreading to other beds, even after trying to eliminate it because I have so MUCH!!