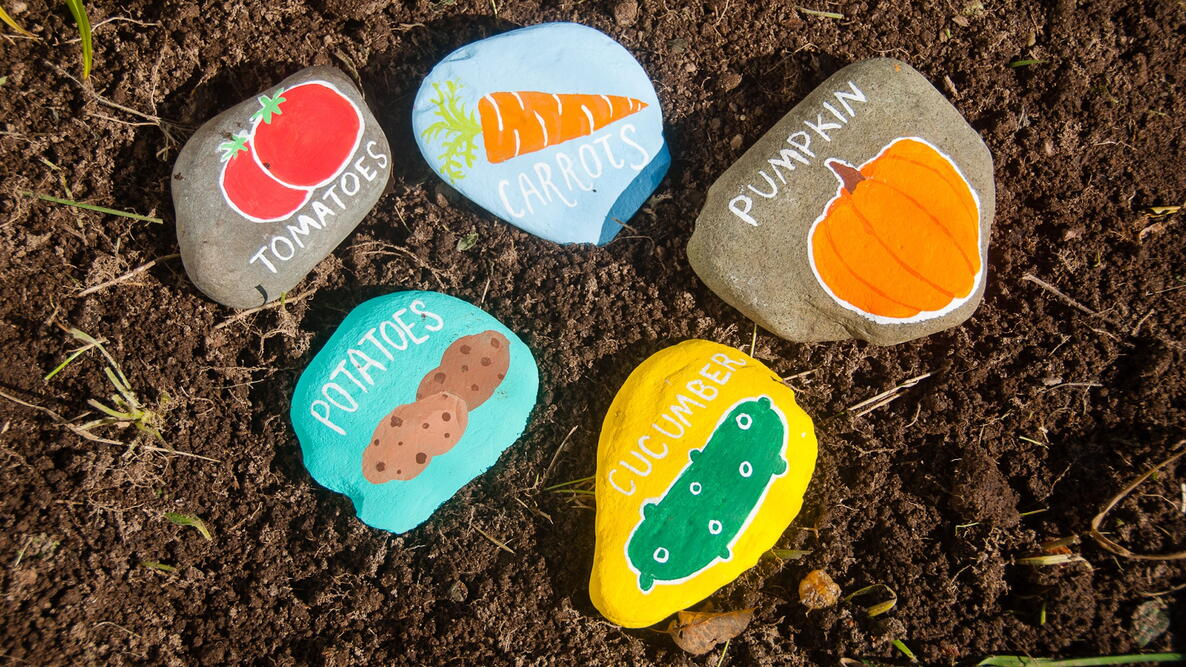
Marking the plants in your garden is essential for keeping track of seed rows before they germinate, and it’s a nice way to liven it up. This simple DIY project to create garden markers costs nothing and adds a charming touch of decor to your garden. You can follow our step-by-step photos and designs, or adjust them as needed to match the plants you grow. Who doesn’t love a DIY project?
Project at a Glance
- Project time: 3 hours
- Skill level: Beginner
- Cost: Under $10
- Best for: Anywhere in the garden
- Lifespan: Several years
Materials & Tools Needed
- A supply of smooth stones—anywhere from about 3” to 16” long
- Acrylic paints in various colors
- Matte finish spray (for waterproofing)
- Small art-style paintbrushes
- Pencils
- Garden hose (for washing the rocks)
- Paper towels (for drying the rocks)
Safety Note: Always use caution when working with hand or power tools, wear appropriate safety gear, and follow the manufacturer’s instructions.
Making DIY Plant Markers
Step 1: Select Your Rocks
The first step—choosing your actual stones—may be one of the best steps of the project. Most of the stones used in the photos are between about 6” and 10” long.
If you live on a hobby farm or small homestead, you probably have plenty of places from which to source small rocks. We sourced the rocks in these photos from along the edges of old farm fields, where farmers of the past collected great piles of stones when originally clearing the fields and from subsequent plowing and tilling.
When selecting rocks for your plant markers, consider whether they will lay flat on the ground nicely and how you might create a design. If you’re hoping to create a somewhat detailed bit of artwork, smooth stones work better than rough-surfaced ones.

Step 2: Clean the Rocks
You’ll want to remove any dirt and debris that lingers on the rocks. Washing your rocks outdoors first is a good idea; you can leave all that sand and soil outside, instead of indoors at the sink. A simple garden hose makes quick work of the task.

Your rocks will need to dry completely before you try painting them; you can leave them on paper towels and flip them over midway through the drying process so they can dry underneath, too.

Step 3: Paint the Backgrounds
You could leave the background of each stone its natural tone, and simply paint a word or a design on the front. Or, you can add a larger splash of color and paint the entire background of the rock any color you like.
Whatever background you add, wait for it to dry before painting the rest of the design. It may help to avoid loud, neon colors that might distract from the artwork you add later.

Step 4: Outline a Design
This is the step where you get to be the most creative. Instead of immediately painting your design in color, take a pencil and experiment with a very light outline of your concept. You can adjust object and text sizes at this stage and easily correct errors before you begin painting.
Work with the pencil until you’re satisfied with your design—it could be anything you’re growing in your garden: sunflowers, tomatoes, zinnias, carrots, potatoes, whatever!

Step 5: Color the Design
Everything starts to come together now. Select various shades of paint and perhaps different-sized paintbrushes to color the sketch you started in step four.
Don’t feel limited to the standard colors in your paint set—mix colors, add white to lighten a shade, combine colors to get just the tone you need. Small details—leaves, spots, lines—can help make the DIY garden plant markers even more vivid.

Step 6: Waterproof
A basic matte-finish spray can quickly protect the paint from the weather, so you can leave your DIY weatherproof plant markers out all the time.. Do this outdoors, and then let the rock dry.

That was easy—and fun. Now you can take your new plant markers and place them around your garden beds. Other than perhaps the paint, this project costs basically nothing, and there’s a lot of satisfaction in putting materials from your own property to use in a new way.
Frequently Asked Questions
Do I Need Artistic Talent to Make These Garden Markers?
Not at all! You can make these as simple or as elaborate as you wish. In fact, you might discover you have artistic talent you didn’t know you had!
Can I Use Other Types of Paint?
Acrylic is best for this project, but you don’t have to use liquid acrylic paint—you can try using acrylic paint pens. These are even easier for beginners to use. The National Gardening Association has additional suggestions for fade-resistant garden markers.
Is It Essential to Use the Matte Finish Spray?
If you want your DIY plant markers to last for multiple years, then yes! You can skip the spray, but the marker will likely only last one season in this case.
Photos by Daniel Johnson.

More Like This

Comments