Mapping Out The Garden Beds and Positioning Your Plants
The Almanac Garden Planner - Use It Free for 7 Days!
Plan your 2025 garden with our award-winning Garden Planner.
Learn how to lay out a vegetable garden—and map out where to put your plants. We’ll help you understand how to space out your crops, position the plants within your garden beds, and get started on a layout that works for you!
Site Selection
Before we get started, let’s consider the location of your garden.
- Where do you get the most sun? Ideally, choose the sunniest part of the garden for your beds, away from frost pockets. Most vegetables need 6 to 8 hours of direct sun a day! Note that the south, east, and west sides of your home will get more sun than the north.
- How far away is the water? Make sure you have easy access to a hose or water source!
- Is there a spot near the house? The ideal garden is one that you can see outside your door or window so it’s easy to water and keep an eye on!
- Is there a nice clearing? If you have too many shrubs or trees nearby, they may compete with your garden for nutrients and moisture as well as sunlight.
- How large do you want your garden? It’s better to start small! If you’re new to vegetable gardening, a 10’ x 10’ garden (100 square feet) is a great place to start.
Which plants do you want to grow?
It’s all too easy to jump in with both feet and overdo it! This will only set you up for disappointment as the amount to learn, maintain and weed can quickly become overwhelming.
- For a beginner, perhaps pick 3 to 5 plants that you would like to grow! Consider picking the ones that taste best fresh and/or cost a lot to buy in the store. Then buy 3 to 5 plants of each one. Here’s a good article and list of vegetables for the beginner gardener.
- Then plan to create a few vegetable beds each year, expanding as you become confident.
Deciding on raised beds vs. rows
If the area you are going to use for your vegetable garden is new, then the next decision is what style of garden and planting system you would like to use: raised beds, traditional rows, square foot gardening, etc. In general, it’s a good idea to define garden beds 4 feet wide and as long as you want them to be with a 2 foot path between them. This is about as wide as you can go before it becomes uncomfortable to lean into the middle of the bed (you’ll appreciate this when weeding) without treading on the soil (best avoided as it compacts the soil structure). If you have children around, then it’s useful to clearly mark the edges of your garden beds; building raised beds is a good way to do this (also good if you have heavy or waterlogged soil as they drain well.)
Defining good paths (using materials such as woodchips and weed suppressant fabric) will be important and pay back many times over in the time saved maintaining them.

Consider Dedicated Beds
If you have space, we recommend that you don’t create one giant garden bed, but rather divide up your crops into dedicated beds or spaces. This allows us to plant crop “families” in separate beds, which helps with “crop rotation.” This practice helps with avoiding pest buildup, nutrient depletion in the soil, and disease issues.
Additionally, certain families of plants require special protection. For example, cabbages, broccoli, and cauliflower may be grown together if they are all going to be protected from caterpillars in a tunnel of netting or horticultural fleece.
- Allium Family: chive, garlic, leeks, onions, and shallots
- Solanaceae Family: eggplant, peppers, potatoes, tomatillo and tomatoes
- Brassica Family: broccoli, cabbage, cauliflower, collards, kale, kohlrabi, mustard greens, radish, rutabaga, spinach, and turnip
- Cucurbit Family: cucumbers, gourds, melons, pumpkin, and squash
- Legume Family: beans and peas.
The plants in each family are grouped together and planted in the same beds as much as possible, so we can easily rotate them to a different bed the following year. Learn more about crop rotation.
When it comes to perennials (such as asparagus, rhubarb, and strawberries), they must have separate and permanent space, since they come back year after year. For example, gardeners will grow rhubarb near the compost bin or asparagus along the side of the garden.
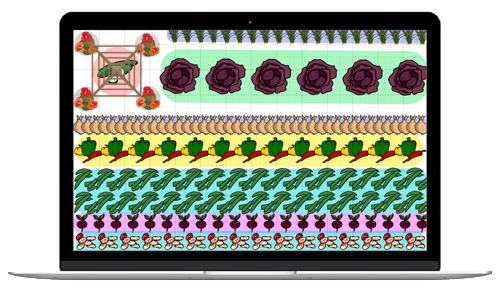
You can lay out your beds on paper, but these days, we much prefer to lay them out on the computer with the Almanac Garden Planner. This tool will automatically calculate how many plants can be grown in each space to help you know how many seeds and plants you will need.
(Note: Within the Garden Planner, mark out your beds with the rectangle tool. Switch your tool to Garden Objects to select a particular style of raised bed.)
Companion Planting
Many different crop layouts can work for a single garden space. Another gardening technique which we’ve had great success with is called “companion planting.”
- There are a number of well-known flowers that attract beneficial insects (ladybugs, hoverflies, etc) that will naturally control plant pests. See which flowers work as companions.
- Certain vegetables pair well together, helping each out in terms of pest control, whether it’s deterring pests or attracting beneficials. See our Companion Planting Guide.
- Tall plants can shade others or can be used to offer support to others (e.g., climbing beans can grow up sweet corn).
Design Your Paths
- Make access paths between beds at least 2 feet wide to enable easy access for weeding and harvesting.
- Paths can be made of grass if they can be easily mown.
- Alternatively, lay cardboard and cover it with a mulch of wood chips, or pour a loose material such as gravel over weed-suppressing fabric.
- For a more permanent path surface, consider using brick or pavers.
If you’re using our Garden Planner, there are a number of path types to add to your plan. Irregular shapes can be created by selecting a texture from the Palette, then adding solid shapes.
Step-By-Step Planning
With the above principals in mind, here are recommendations for placing plants in a new vegetable garden:
- Tender Plants: Plants such as tomatoes, peppers, eggplant, and basil are the most fussy. Unless your climate is extremely warm, you’ll want to reserve the best sunny spots in your garden for these high-value crops so add them to your plan first. South facing walls can be particularly good for providing the heat that these plants like in order to produce an abundant harvest.
- Roaming Plants: Next, place plants that like to send out vines that roam around the garden—melons, squashes, etc. These need to be situated at the edge of your vegetable beds so that the broad leaves attached to the vines don’t cover your other plants. Placing them at the edge lets them spread out across paths or grass.
- Vertically Climbing Plants: Anything that grows up supports—peas, beans, and some squash and cucumbers—will need to be located where they won’t shade other vegetables. The one exception is areas with very hot summers, where some cool-season crops such as lettuce and spinach can benefit from shade in the heat of the day.
- Irrigation: Some plants perform badly in dry conditions—like celery, onions, and strawberries. Areas of your garden that are slightly lower will retain more moisture or you may need to plan to provide irrigation to get consistent growth.
- Pollination: Certain plants need to be near others in order to pollinate well and “set fruit” (i.e. produce the edible portion). The main one you need to consider is sweet corn, which should be grown in blocks to ensure that it produces full cobs— see our article on sweet corn for details.
- Accessibility: What plants do you want to be able to regularly harvest? Herbs, salad, tomatoes, etc.? These should all be placed as near to your kitchen as possible. Not only will you then be more likely to use them, but it will help you to keep on top of the weeds and remove slugs regularly.
- Succession Planting: If you are short on space or want a crop throughout the season, consider using succession planting and intercropping—see my article on getting more crops from an area and our video on using the Garden Planner to organize Succession Planting.
- Don’t Overcrowd: Finally, tempting though it is, be very careful not to overcrowd plants as you add in the remaining ones to your plan. This is the number 1 mistake made by new gardeners and it’s easy to see why—plants look so small as seedlings and we all hate pulling up the result of our hard work to thin them out! Our Garden Planner can help with this and show just how much you can get into your space.
Try out the Garden Planner on your computer (for free).
While we’re providing guidelines, please know that gardening is art + science! There isn’t a hard and fast set of rules. The art is in using these guiding principles to design a garden that fits you and becomes a satisfying experience!
Catherine Boeckmann


ADVERTISEMENT
First, let me say how much I enjoy all your videos. No matter what the topic, there is always something I can take away from it. I live in the southeast US -Zone 8. My backyard abuts a utility easement - flat, ample sun and grass/weeds. Raised beds allow me to control the weeds. The beds are all 4' x 8' and I have been using them for more than 25 years. My first beds were untreated lumber which degrades over time. Replacing rotting beds is labor intensive - not too bad when you are young, but.....I now replace beds with kits using man made products. Much more costly, but easy to install and they last. After watching your videos last year, I decided not to vigorously clean out the beds in the fall, leaving woody plant "skeletons". I planted lettuces under the canopy of the bare branches which gave some protection from light frost. As I started preparing for the new season, I found beds which contained plant "skeletons" had noticeably less weeds!!! Hopefully they provided a winter home for insects, as you noted in your video. For the first time, I planted green manure cover crops: daikon radishes and fava beans. The radishes have now bolted, bringing in the bees. I'll turn them under as I replant. The fava beans, planted solely for turning into the soil, are now setting flowers and I may actually get some beans before the temps rise! Companion planting: For the crops I grow, it's basically making sure that the garlic/onions don't share space with beans/peas. Basil and marigolds are planted throughout the garden. I added alyssum last year and will plant more this season. It stays low and doesn't crowd out other plants. I had two African Blue Basils which became enormous - each plant taking up 1/3 of a bed. I just couldn't cut them back because they brought in hundreds of bees. This year I will plant them in large pots placed adjacent to the garden to attract bees and free up valuable vegetable space. Well..I have really gone on and on!!! Again, thanks for all the info!!
I live in a "hollow" or cove on the side of a mountain in upstate NY. My daily light is very limited, with the sun being blocked a bit from the east, and in the afternoon, much by the west, and trees, mostly tall oaks and pine trees that do not help, once their canopies are full. Over the years I have moved my gardens around, as to try and get the most daily sun, never exceeding six too eight (maybe) hours, tops. I now make use of various size inexpensive felt planters with my own potting/garden mix, and move several of the more "sun-loving" plants about twenty to thirty feet from east too west, and a little north too south, and gain up to three more hours of sun. It works like a dream increasing plant health and yeilds. Of course, there are many that I can not move, like the two twenty gallon three sisters, or any climbing varieties of veggis, these I place in the best posistioning, as too get the optimal sunshine. It only takes a few minutes to slide these twenty planters or so, a few times a day, and is easy-peasy for this disabled, retired ol' timer. As I write, it is time, right now, too start germinating the first flowers and vegetables for my 2020 garden. Happy gardening!
We live in the San Francisco Bay Area which is in zone 9B, so we are going to grow vegetables in raised beds. I also built a small grow box and will start everything from seed. Two weeks ago I seeded snap peas and Broccoli. I also seeded two containers with carrot seeds. For the 2 ft high raised beds I am using Kellog's raised bed and potting soil. Also we have row covers and instead of putting the hoops into the soil I attached 2X4 boards on the inside of the raised beds which are 3 feet wide. I drilled 1/4 inch holes for the hoop wire are the correct spacing. For the peas, I will put them in a 2 ft diameter 1 foot deep metal tub with tomato cages as supports and if we get a frost I plan on protecting them with clear plastic. The Broccoli will go in the raised beds under the row covers. For the peas and Broccoli, I will intersperse with carrot seeds. Currently I am hardening off the peas and broccoli by taking the seedlings outside for an hour or two. We will see how it goes.
Sounds terrific, Oliver! Let us know—or better, please—SHOW us all how it goes on Instagram.com/theoldfarmersalmanac! We’re not too old to learn new tricks and would enjoy learning from you! Thanks for sharing!
I have to say that even with all of my years of experience, the videos have been so helpful. I love his simple and calm explanations of each topic. I now have more knowledge in my apron to make this year's crops great. Cauliflower and cabbage don't like to grow together. Thanks for sharing these great tips.
Thank you for your nice comment! We’re very glad to hear that you enjoy our gardening videos.
very useful . . . starting community garden.
Hi, like the look of this tool. Is it only UK climate? peaceout, Ini
Hi there. We have climate data for the UK, US, Canada, most of Western Europe, South Africa, Australia and New Zealand. When you type in your location the Garden Planner looks up your nearest weather station to set recommended sowing, planting and harvesting times for your area (we find this to be more accurate than the more general ‘hardiness zone’ system).
Good video...very informative and points out lots of things to consider when planting a garden. I'm sure I will reference this video several times as I plan the garden this year. Found the video clear, concise and very on point. Thanks.