
Looking for a meal that says “celebration”? Look no further than Timpano. Learn all about this impressive Italian baked pasta dish—plus five tips to simplify the recipe for a fabulous feast.
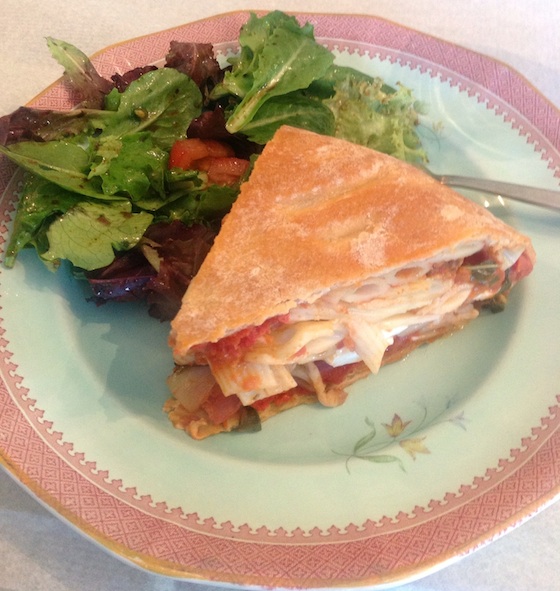
Timpano is a baked pasta dish with a huge round dome of crust stuffed with delicious ingredients—pasta, meatballs, cheeses, salamis, and sauce. The word timpano means “drum” in Italian.
When my Italian-American grandparents, aunts, and uncles visited from out of town for a special family event, I wanted to think of a dish worthy of the occasion.
Read Next
If you’ve ever seen the “foodie” movie Big Night, you’ll be familiar with Timpano. Take a look at the movie clip here.
Timpano is more of a recipe “activity” than a “let’s get dinner on the table” meal. It’s one crazy Italian dish that is meant for a gathering—and it really helps if you have some guests in the kitchen.
That said, the ingredients are not out of the ordinary: pasta, cheese, meatballs, eggs, salami, and so forth.
Traditional Timpano Recipe
This recipe makes 16 servings using a 6-quart enamelware bowl. Yes, you may have leftovers!
You may make or buy your dough. The dough for timpano is rolled out like pizza, the diameter of which is determined by the pan you are baking it in. Add together the diameter of the bottom of the pan, the diameter of the top of the pan, and twice the height of the pan. The total will equal the approximate diameter needed. The dough may be kneaded in advance and set aside or refrigerated overnight. Return it to room temperature before rolling it out. Place the rolled dough in the timpano baking pan while the pasta cooks.
Ingredients:
Dough
4 cups all-purpose flour
4 large eggs
1 teaspoon kosher salt
3 tablespoons olive oil
1/2 cup water
Filling
2 cups 1/4 x 1/2-inch Genoa salami pieces
2 cups 1/4 x 1/2-inch sharp provolone cheese cubes
12 hard-boiled eggs, shelled, quartered lengthwise, and each quarter cut in half to create chunks
2 cups little meatballs: you can buy small-size meatballs or follow recipe below*
8 cups of Ragu sauce: You can buy or make homemade.
3 pounds ziti, cooked very al dente (about half the time recommended on the package) and drained (18 cups cooked)
2 tablespoons olive oil
2/3 cup finely grated pecorino Romano cheese
4 large eggs, beaten
*Meatballs
1 pound ground beef chunk
2 tablespoons chopped fresh parsley leaves
1 large egg, lightly beaten
5 tablespoons finely grated pecorino Romano cheese
1 cup fine bread crumbs
2 cloves garlic, finely chopped
Kosher salt and freshly ground black pepper
2 tablespoons olive oil
Combine all the meatball ingredients. In a large nonstick frying pan, warm olive oil. Roll the meat mixture into very small balls, using 1/2 tablespoon of meat for each. Then brown meatballs on all sides, about 8 minutes. If they stick to the pan, they are not ready. Set aside.
Directions:
- Dough: Place the flour, eggs, salt, and olive oil in a stand mixer fitted with the dough hook or a large food processor. Add three tablespoons of the water and process. Add more water, one tablespoon at a time, until the mixture comes together and forms a ball. Turn the dough out onto a lightly floured work surface and knead to make sure it is well-mixed. Set aside to rest for 5 minutes. (To knead the dough by hand, mix the flour and salt together on a clean, dry work surface or pastry board. Form these dry ingredients into a mound and then make a well in the center. Break the eggs into the center of the well and lightly beat them with a fork. Stir in 3 tablespoons of the water. Use the fork to gradually incorporate some of the dry ingredients into the egg mixture. Continue mixing the dry ingredients into the eggs, adding the remaining water one tablespoon at a time. Knead the dough with your hands to make a well-mixed, smooth, dry dough. If the dough becomes too sticky, add more flour. Set aside to rest for 5 minutes.
- Flatten the dough out on a lightly floured work surface. Dust the top of the dough with flour and roll it out, dusting with flour and flipping it over from time to time, until it is about 1/16 inch thick and is the desired diameter. Generously grease the timpano bowl with butter and olive oil. Fold the dough in half and then in half again, to form a triangle, and place it in the pan. Open the dough and arrange it in the pan, gently pressing it against the bottom and the sides, draping the extra dough over the sides. Set aside. Preheat the oven to 350 degrees F.
- Filling: Salami, provolone, hard-boiled eggs, meatballs, and ragu sauce should be at room temperature. Toss the drained pasta with the olive oil and 2 cups of the ragu. Distribute six generous cups of the pasta on the bottom of the timpano. Top with 1 cup of the salami, 1 cup of the provolone, 6 of the hard-boiled eggs, 1 cup of the meatballs, and 1/3 cup of the Romano cheese. Pour 2 cups of the ragu over these ingredients. Top with 6 cups of the remaining pasta. Top that with the remaining 1 cup salami, 1 cup provolone, six hard-boiled eggs, 1 cup meatballs, and 1/3 cup Romano cheese. Pour 2 cups of the ragu ver these ingredients. top with the remaining 2 cups of ragu over the pasta. Pour the beaten eggs over the filling. Fold the pasta dough over the filling to seal completely. Trim away and discard any double layers of dough.
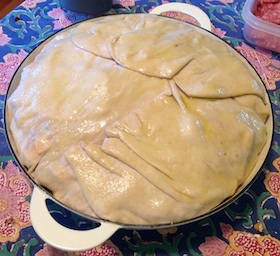
- Bake until lightly browned, about 1 hour. Then cover with aluminum foil and continue baking until the timpano is cooked through and the dough is golden brown (and reaches an internal temperature of 120 degrees F), about 30 minutes. Remove from the oven and allow to rest for 30 or more minutes. The baked timpano should not adhere to the pan. If any part is still attached, carefully detach it with a knife. Grasp the baking pan firmly and invert the timpano onto a serving platter. Remove the pan and allow the timpano to cool for 20 minutes. Using a long, sharp knife, cut a circle about 3 inches in diameter in the center of the timpano and cut all the way through to the bottom. Then slice the timpano as you would a pie into individual portions, leaving the center circle to support the remaining pieces.
5 Timpano Recipe Tips
No matter what recipe you use, there are a few tips for making a good Timpano, which I’ll share below. Plus, here are a couple of tricks on shortening the process, which won’t affect the result.
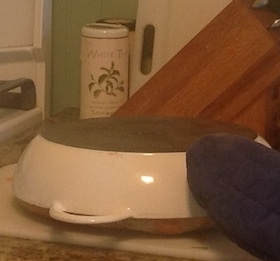
1. Use the right pan or bowl: It is very important to have the right-sized bowl to create that dome shape. Traditionally, Timpano is baked in a round enamelware bowl (literally, a wash basin), evenly distributing the heat. This type of bowl is wider on top than it is on the bottom. Here is an example of an enamelware bowl. Any enameled Dutch oven might be fine if it’s deep enough.
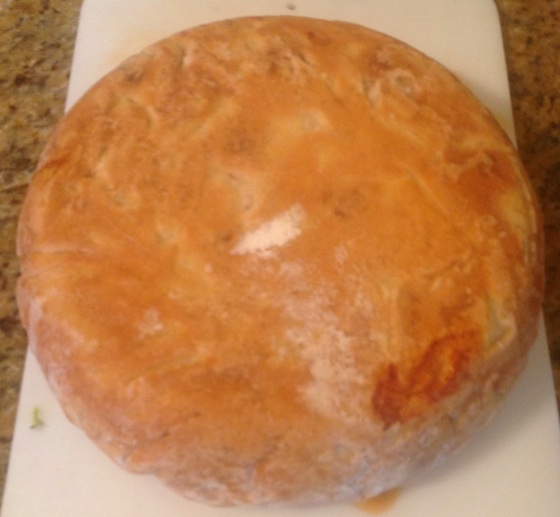
I borrowed my enamel bowl from a neighbor. The recipe calls for a 6-quart bowl to get that drum shape. Unfortunately, the closest size I could find was 4 quarts (yes, I had a lot of leftover ingredients!). You can see from my photos that my Tmpano is not very high (that said, it turned out of the bowl perfectly!).
Be sure to grease the bowl heavily with extra-virgin olive oil and butter, as the recipe states!
.jpg)
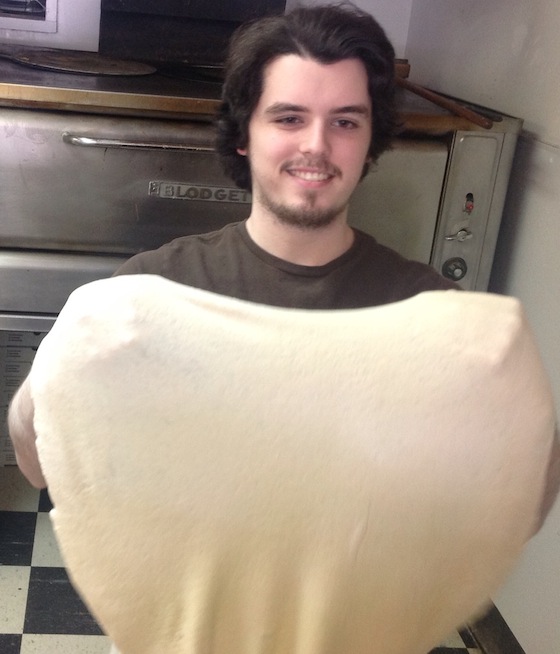
2. Call your pizza parlor: The trickiest part is to figure out the correct diameter needed for the dough (crust). The crust must hang over the pan’s edge and then completely over the filling so it’s all sealed in.
Making the dough yourself is possible, but rolling it into a consistently 1/8-inch thick sheet requires significant effort. I have a fantastic brick oven pizza parlor in town, and asked the owner if I could buy his dough for Timpano, and his guys helped me roll it out! Call your pizza parlor a few days in advance.
Most pizza parlors make a traditional 24-inch round, so you will need to ask them if they need to roll it out larger based on the size of your pan (see above directions). I was able to stretch the pizza round for my 4-quart bowl.
3. Prepare ingredients in advance: You can prep most everything in advance if you wish. I followed a tip to make the sauce, penne, and meatballs the night before and let them all sit together. They meld nicely and make a nice crust on the meatballs.
At my pizza parlor, I was told, “Next time, just ask us for our homemade sauce, and I’ll get the meatballs for you, too.” Two more time savers if you need them!
Also, I am more conservative when adding the sauce to the Timpano. I advise adding just enough so the pasta seems cohesive, not to make it wet or it will collapse. I added the extra sauce later on the side when serving the slices.
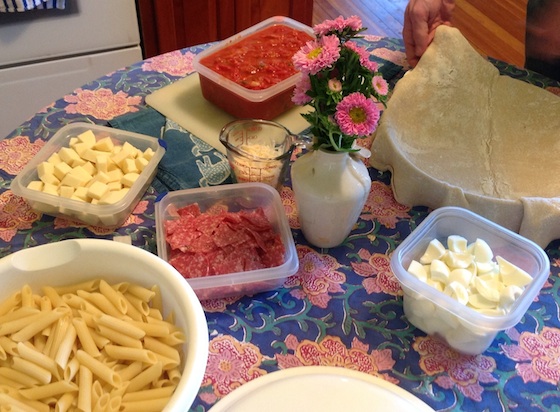
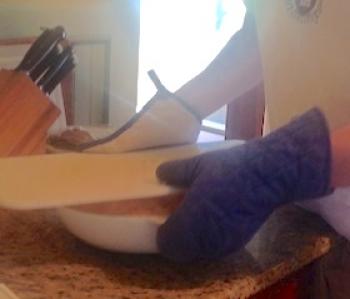
4. Create an assembly line: Before filling the Timpano, set out individual bowls with ALL of your chopped cheese, salami, and eggs (we omitted yolks due to a no-yolk guest), plus your pasta and sauce. I mean it! You must have everything ready to go pronto on the counter because you need to layer in all the ingredients before the dough dries out. All ingredients should be at room temperature.
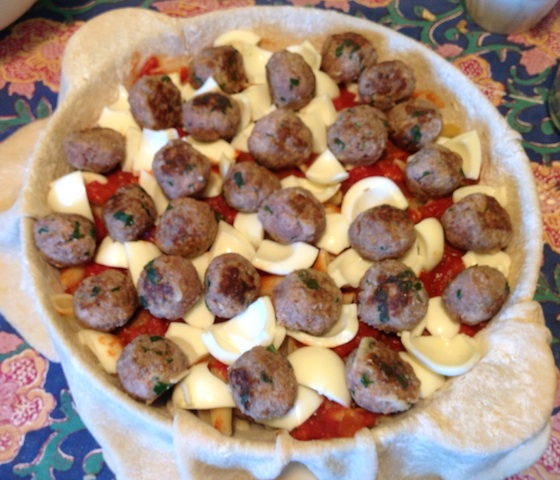
As you layer the ingredients (not too thick!), feel free to shake the pan so that they settle; you want a firm Timpano. In the picture below, my husband is pressing down to make it sturdier and to make more room! Fill up the pan until the ingredients are even with the edge. Then, cover it with dough and seal it with a little olive oil.

5. Let it sit for AT LEAST 30 minutes after baking, maybe more, so the Timpano will stay together better. This is CRITICAL. Don’t lose your Timpano! Here is what you do:
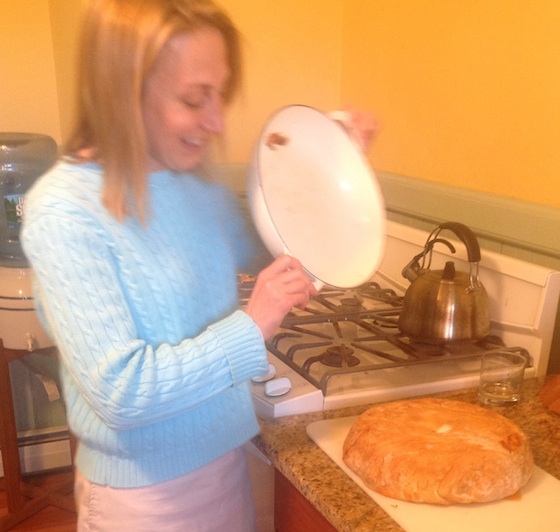
- After baking the Timpano and resting for 5 minutes, set a platter or cutting board on top of the Timpano pan. Then … DRUM ROLL … flip it over! My brother did the honors.
- Keep the hot enamel dish with the Timpano sitting on top of the platter for those 30 minutes so it settles, firms up, and does not fall apart. We waited 45 minutes. Then, the Timpano will gently release from the pan, and you can lift the pan off for the “reveal!”
Cut the Timpano into wedges and serve with a bit of red sauce. A big green salad and a nice bottle of red wine are all you need to add since Timpano is a meal unto itself. You’ll be stuffed!
.jpg)
The result? Bellissimo! The entire family was satiated—and is still talking about the meal.
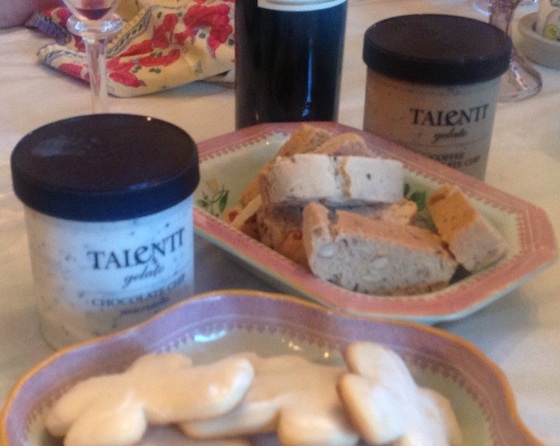
Dessert? I kept it very light for those who like to end on a sweet note—biscotti, a scoop of gelato, and vin santo (dessert wine).
How does it look to you? And do you have your own “big” night dinner ideas? I would love to hear about your experiences with a new food adventure.
Buon appetito!
Catherine Boeckmann


ADVERTISEMENT
Here's our version of it from a Big Night recreation in Toronto. What a dish!: https://youtu.be/QztOd3eCmiU
Not sure when the movie Big Night was released but saw it for the first time last night.
My father was from Sicily but I don't recall ever hearing of this fabulous dish! he passed on four years ago, my mother passed just his month so I have no one to ask :(
That certainly won't stand in my way. After seeing the movie I really want to make this and since I already make my own dough, sauce and meatballs it won't be a chore for me(cooking never is).
Really want to make this for Sunday dinner but would have to omit the sliced egg, hubby doesn't like having egg in this type of dish. has anyone tried it without the egg? I kinda feel like it would amount to another version of lasagna, just more time consuming to make.
Thank you for posting the additional tips.
I don't eat meat - will the recipe work as well with a substitute or extra veggies?
We haven't tried a no-meat Timpano. Italian meats are a big part of this dish. However, you could try soy meatballs and soy Italian Sausage. Or, for an all-veggie timpano, you could try eggplant (yum!). Here's a recipe which looks good: www.prouditaliancook.com/2008/04/eggplant-timpano.html.
Yum! Thanks for the tip about checking with a pizza parlor. I wouldn't have the nerve to try to make the dough.
My in-laws were immigrants from Calabria, Italy and I have had many delicious and unusual Italian dishes but "Timpano" was not one of them. Where the hostess and guests all join in and prepare this dish is a great idea.
What a great recipe I can't wait to try it. Thanks for "showing" me how to do it. A picture is worth a thousand words!!!
Love the one dish meal for entertaining too. More time to spend with guests! Keep them coming!
This recipe makes me hungry for pasta and it is only 6am! What a wonderful Italian dish.
Timpano sounds like a party...both to create and then to enjoy! What a great way spend time with friends and family! Love it. Thanks!
I am impressed and now hungry for something Italian and spicy!!!! I make a pretty good Chicken Tetrazzini, but it is nothing like your Timpano!! Your directions and pictures were fabulous and very helpful if I ever get up the energy to make your recipe!!!