
Patching Drywall Step-by-Step
That hole in the wall that you’ve been looking at for three months? Fix it! With one trip to the hardware store, that hole can be repaired easily. Handyman Tom Dvorak will show you how to patch drywall with simple step-by-step directions—including photos.
Hardware stories are pretty busy selling a lot of paint, brushes, and sandpaper right now as folks tackle little projects at home.
A hole in the drywall is a common home improvement project. Drywall is very durable, but not destructible. Doorknob dings, nail nnicks, and other blemishes happen over time.
Read Next
If you’re tired of that hole in the wall, let’s fix it. Note: If your wall has more of a hairline crack, this is a different issue. See our page on how to fix cracks in walls.)
This project is rated “beginner.” We’ve broken down the steps in more detail than many guides so it’s easier for beginners to follow
A Few Expectations
You will need to allow for drying time in between several of the steps, so this is a repair that you will work on for a little while over a few days.
You WILL have an expert level of finish if you apply thin coats, and take your time. Be careful not to rush it. You are not being paid by the hour! As a rule, we add 3 coats of drywall (“mud”) but you could add 4 coats which is even better. Do not put on coats too thickly. Less is more. And you only want to sand the last coat.
Materials and Tools Required
Fortunately, a hole can easily be repaired by a regular homeowner who doesn’t want to spend the time or expense to bring in a contractor. It just requires travel to the hardware store and some patience.
No professional tools are required. For example, a professional would use a screw gun and not use glue at all.
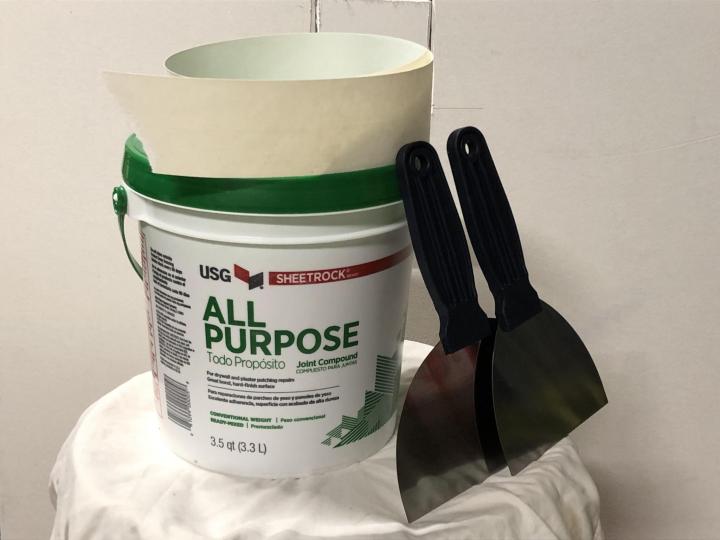
Materials
- Drywall for patching*
- All-purpose joint compound**
- Construction adhesive
- Paper drywall tape
Tools You’ll Need
- A few paint stirrers (free at most hardware stores), the number will depend on the size of the hole you are fixing
- Ruler or something to use as a straight edge
- A utility knife (with a new, sharp blade)
- 4” and 6” taping knives, or flexible scrapers
- Sandpaper or sanding block (medium grit)
- Paintbrush
* Drywall comes in different thicknesses so you will need to complete the first few steps before you cut out the damaged drywall piece to bring to the hardware store. Someone there will be able to help you find a piece of drywall that is the same thickness of the damaged drywall. The store staff will also be able to see how large of a hole you need to repair and help you purchase the right quantity of drywall.
** Drywall compound (or “mud” as it’s called in the trade) is premixed and available in 1-gallon pails. This size should be ample for these types of repairs.
That’s it. Now here’s the step-by-step process to help you complete your repair. You will need to work on this over a few days to allow for drying time.
The Steps
Day 1
1. Measure and mark the area of drywall that you are going to remove. Measure about 1” from the edge of the hole.
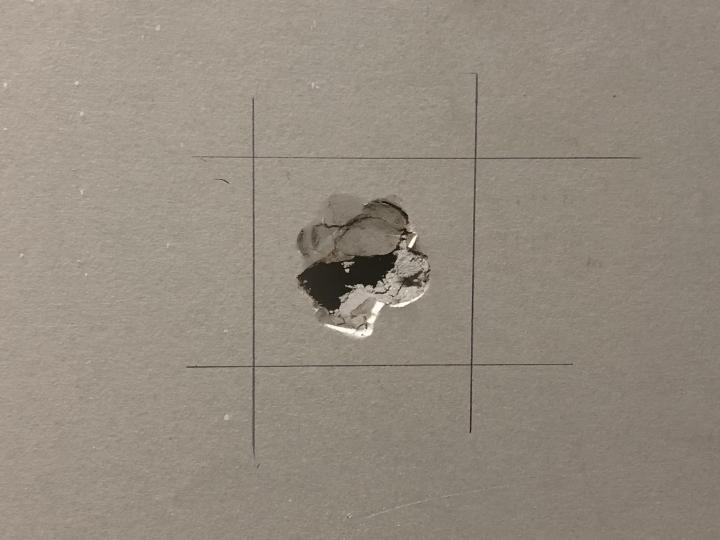
2. Using a utility knife with a sharp blade, cut along the lines that you just made until it goes all the way through the drywall. It may be easier to make several cuts along one line instead of trying to go all the way through on the first pass. A sharp blade is going to cut more cleanly and be safer to use.

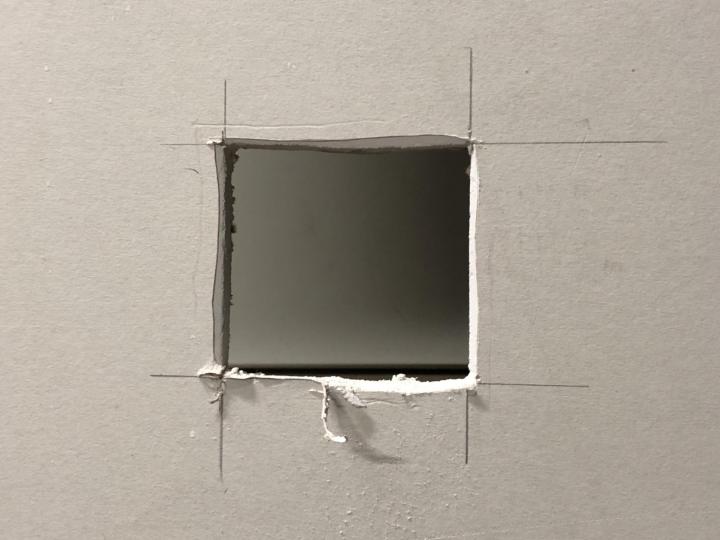
3. At this point, if you don’t already have your supplies, take the section you just cut out with you to the hardware store. Someone there will be able to help you find a piece of drywall that is the same thickness of the damaged drywall. Most homes use 1/2” thickness drywall, but if you aren’t sure it’s ok to ask. Stores will usually sell 2 x 2 pieces of drywall to use for patching.
A note on materials before you continue. There are lots of different types of joint compound. A standard, all-purpose joint compound will work best and give you the smoothest final product.
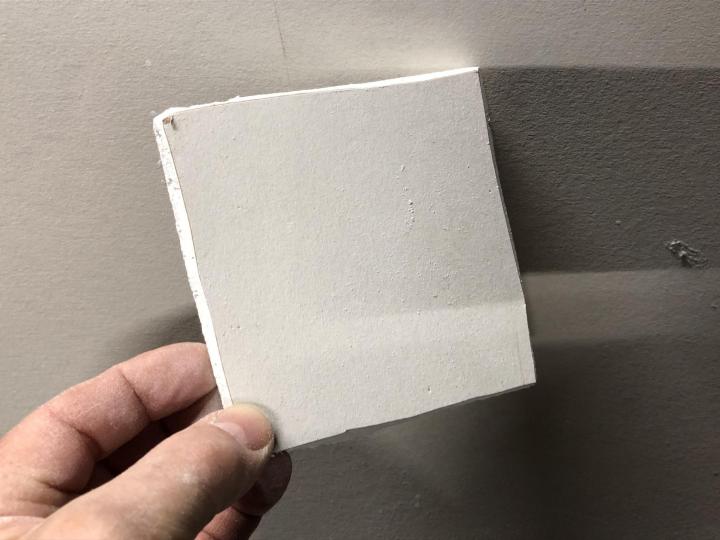
4. Now that you have cut out the damaged area and have all of your supplies, use the utility knife to clean up the edges of your repair area. If you can angle the edges a little, this is best, but as long as you don’t have any rough edges you are ready to proceed. (Note the clean, angled edges of the repair on the right side. This is what you want to try to accomplish.)
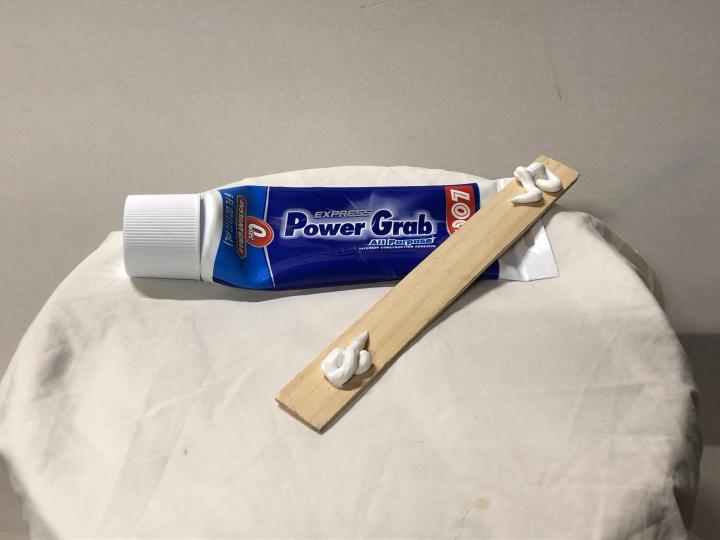
5. Next you will cut the paint stirrers until they are about three inches wider than the area you are trying to repair. Check that you will be able to put them through to the backside of the area that you are fixing, either horizontally or vertically. Then put a generous amount of construction adhesive on the ends. Put the paint stirrers through the hole and pull them towards you firmly. These need to dry overnight to ensure that the adhesive is set.
Day 2
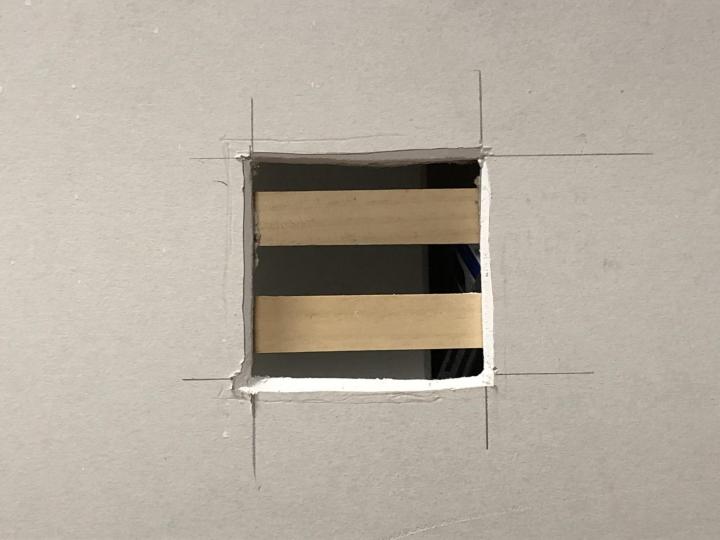
5. You should have let the paint stirrers set overnight so that the adhesive is dry. Now cut a patch that is the same size as the hole you have made. Make sure the edges are smooth. The patch doesn’t have to be an exact fit but it should be fairly close. It’s better to need to cut a little bit more off than to have a patch that is just too small.
6. Apply construction adhesive to the paint stirrers that you put in place yesterday. Press your patch piece into place.

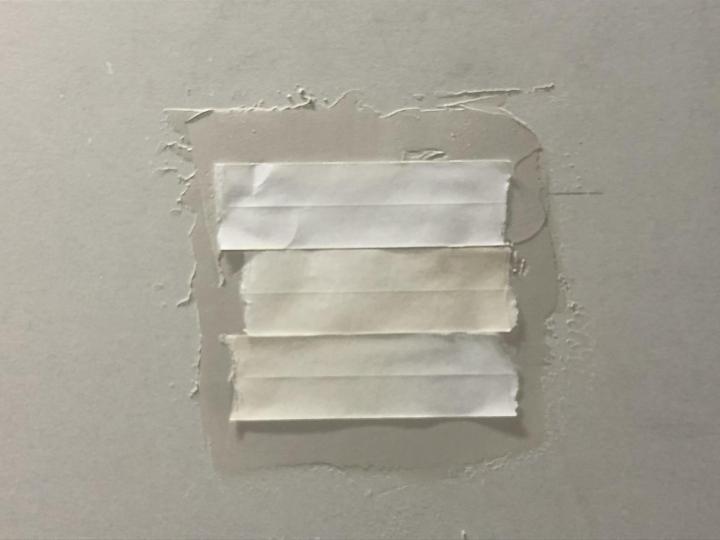
Now its time for the joint compound, two scrapers and drywall tape.
When you apply joint compound you will use the larger scraper (6”), using the smaller scraper (4”) to hold excess. Don’t put excess joint compound back into the tub, there may be dust or debris in it.
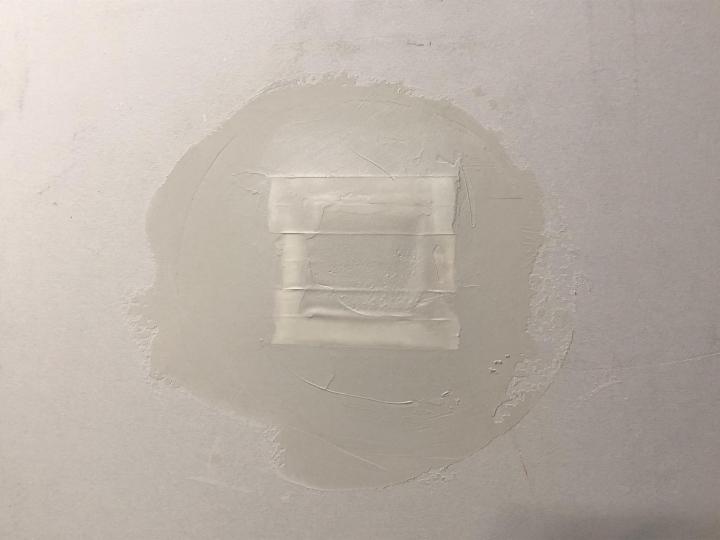
7. Apply a thin coat of joint compund so that it completely covers the repair area and about 2 inches beyond it. Then cut enough strips of the tape to cover the repair, plus about 1 extra inch all the way around. Press this tape into the joint compund.
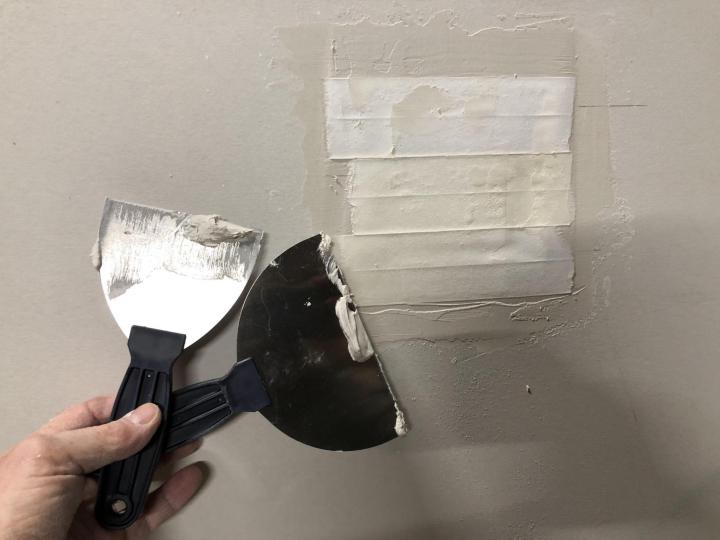
8. Make sure you wipe the blade of your scrapers and then go over the tape to flatten it out. You will also remove some excess joint compound.
9. Now apply the first coat of joint compound over the tape. Work in a circular motion, this lets you feather out around the edges which will help your repair disappear once you paint it. This is the first of three coats. To get the best result, apply thin coats. Now let this dry overnight. Drying time will vary based on humidity, and could be as little as 12 hours.
You can also see that you need to cover an area much larger than the original damaged area. This is so that you can sand it smooth and feather the edges to blend everything into the existing wall.
Day 3
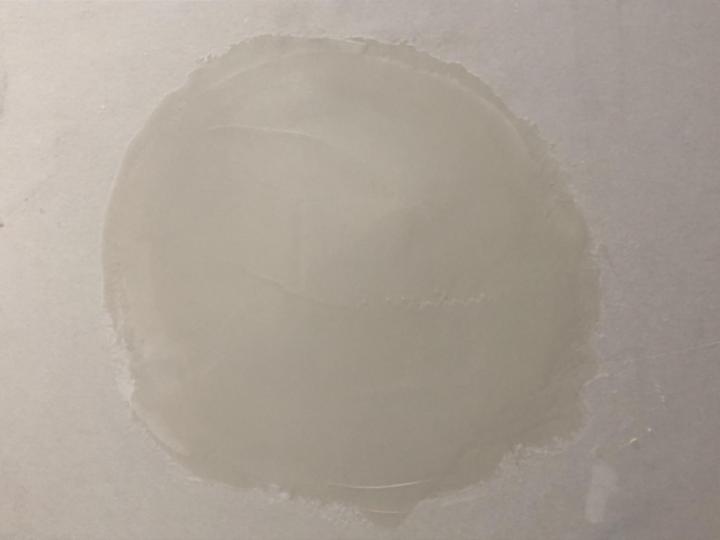
10. Apply another coat and let it dry for 24 hours.
Day 4
11. Apply another coat and let it dry for 24 hours.
Day 5
12. Now that you have three coats, sand your repair using a circular motion. You want a smooth finish everywhere and it should just about disappear around the edges.
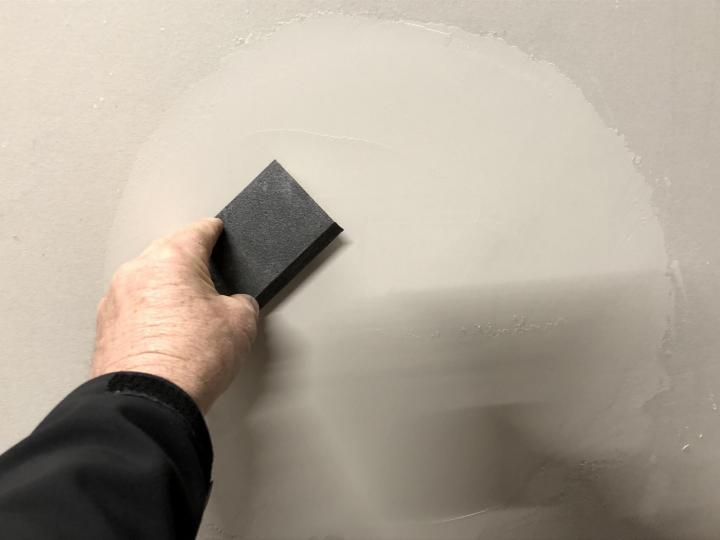
13. Wipe off all of the dust with a slightly damp cloth. Your repair is now done and you are ready to prime and paint. See our tips on how to choose and use paint brushes.

We hope these photos and instructions are clear and help you successfully repair holes in your your drywall.
This is Tom’s first DIY article. We’d love to hear what you think! And if you have any questions, please do not hestitate to comment below.
Also, we’d love to hear what other beginner home or yard projects you’d like to tackle!
Tom Dvorak


ADVERTISEMENT
Thanks for the information. It was really helpful.
I find nothing on the BEST DAYS CALENDAR to guide me on home repairs I am scheduling for the next few months. Suggestions would be much appreciated!
We would classify both those things as “projects,” so you could follow the Best Days to Start Projects here.
Excellent article. I’d like see more of this type for beginners. Thank you!
Very good easy to understand article about "filling in a hole on drywall" without being too technical. I'm a first time DIY homeowner and now I've got this!! Thanks your pictures and instruction.
Thank you for a beginner fix! I'm going to try this repair. I have a hole from a doorknob. I don't have any experience or have any real tools so this is perfect. The paint stirrers are very clever.
Thank you for the photos and instructions. I have searched for this for a few years to repair a drywall hole we have.
Why do you need to apply drywall tape to the patch. Seems that would make it harder to smooth-out.
Excellent article. The instructions are clear and the photos make it perfect. Write more articles!