
Sign up for our daily newsletter to get gardening tips and advice.
Planting, Growing, and Harvesting Cabbage
- When seedlings reach about 5 inches tall, thin to leave the desired space between them. If you wish, transplant the thinned seedlings elsewhere.
- Mulch thickly around the area to retain moisture and regulate soil temperature.
- Water 2 inches per square foot per week.
- The optimum soil temperature for growth is 60 to 65°F. Young plants exposed to temperatures below 45°F for a period of time may bolt or form loose heads. Cover plants if cold weather is expected.
- Fertilize two weeks after transplanting with a balanced (10-10-10) fertilizer.
- Three weeks later, add a nitrogen-rich fertilizer; cabbage needs nitrogen in the early stages.
- Practice crop rotation with cabbages to avoid a buildup of soil-borne diseases.
Protect seedlings against pigeons with wire mesh, and use netting during the summer months to stop butterflies from laying their eggs on the leaves. It’s also worth growing nasturtiums nearby as a sacrificial crop for cabbageworms, which will be more likely to eat the nasturtiums instead of your cabbages. Mint can be used to help deter flea beetles.
Keep cabbages watered, and weed between plants with a hoe or by hand. During exceptionally cold weather, winter cabbages may need to be protected with row covers or cloches. In very cold regions, growing cabbages in a greenhouse or cold frame will keep them safe.
Some old folklore tells us: Scatter elder leaves over your cabbage to keep the bugs away.
| Pest/Disease | Type | Symptoms | Control/Prevention |
|---|---|---|---|
| Aphids | Insect | Misshapen/yellow leaves; sticky “honeydew” (excrement); sooty, black mold | Grow companion plants; knock off with water spray; apply insecticidal soap; put banana or orange peels around plants; wipe leaves with a 1 to 2 percent solution of dish soap (no additives) and water every 2 to 3 days for 2 weeks; add native plants to invite beneficial insects |
| Black rot | Fungus | Yellow, V-shape areas on leaf edges that brown and progress toward leaf center; leaves eventually collapse; stem cross sections reveal blackened veins | Destroy infected plants; choose resistant varieties; provide good drainage; remove plant debris; rotate crops |
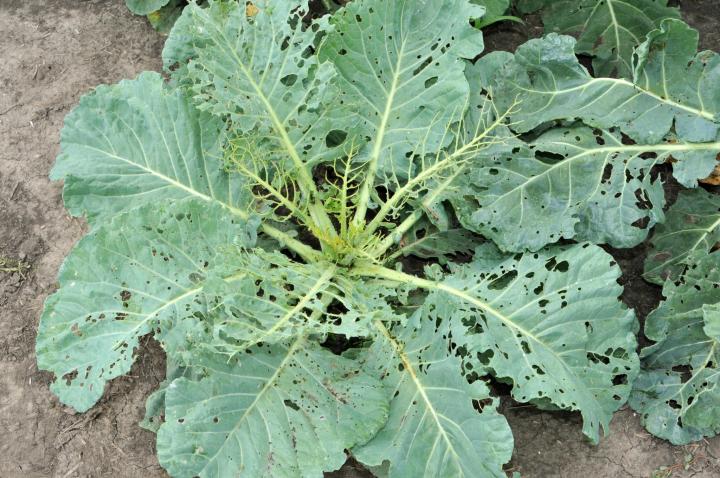
| Cabbage loopers | Insect | Large, ragged holes in leaves from larval feeding; defoliation; stunted or bored heads; excrement | Handpick; add native plants to invite beneficial insects; spray larvae with insecticidal soap or Bt; use row covers; remove plant debris |
| Cabbage root maggots | Insect | Wilted/stunted plants; off-color leaves; larvae feeding on roots | Use collars around seedling stems; monitor adults with yellow sticky traps; use row covers; destroy crop residue; till soil in fall; rotate crops |
| Cabbageworms | Insect | Leaves have large, ragged holes or are skeletonized; heads bored; dark green excrement; yellowish eggs laid singly on leaf undersides | Handpick; use row covers; add native plants to invite beneficial insects; grow companion plants (especially thyme); spray Bacillus thuringiensis (Bt) |
| Clubroot | Fungus | Wilted/stunted plants; yellow leaves; roots appear swollen/distorted | Destroy infected plants; solarize soil; maintain soil pH of around 7.2; disinfect tools; rotate crops |
| Downy mildew | Fungus | Yellow, angular spots on upper leaf surfaces that turn brown; white/purple/gray cottony growth on leaf undersides only; distorted leaves; defoliation | Remove plant debris; choose resistant varieties; ensure good air circulation; avoid overhead watering |
| Flea beetles | Insect | Numerous tiny holes in leaves | Use row covers; mulch heavily; add native plants to invite beneficial insects |
| Slugs/snails | Mollusk | Irregular holes in leaves; slimy secretion on plants/soil; seedlings “disappear” | Handpick; avoid thick bark mulch; use copper plant collars; avoid overhead watering; lay boards on soil in evening, and in morning dispose of “hiding” pests in hot, soapy water; drown in deep container filled with 1/2 inch of beer, or sugar water and yeast, and sunk so that top edge is slightly above ground; apply 1-inch-wide strip of food-grade diatomaceous earth as barrier |
| Stinkbugs | Insect | Yellow/white blotches on leaves; eggs, often keg-shape, in clusters on leaf undersides | Destroy crop residue; handpick (bugs emit odor, wear gloves); destroy eggs; spray nymphs with insecticidal soap; use row covers; weed; till soil in fall |
| Thrips | Insect | Leaves, especially in folds near base, have white patches or silver streaks; brown leaf tips; blistering/bronzing on cabbage leaves; curling or scarring | Remove plant debris; choose resistant varieties; add native plants to invite beneficial insects; use row covers; use straw mulch; monitor adults with yellow or white sticky traps; use sprinklers or other overhead watering |
| White mold | Fungus | Pale gray, “water-soaked” areas on stems, leaves, and other plant parts that enlarge and develop white, cottony growth, later with black particles; bleached areas; crowns rot; plants wilt/collapse | Destroy infected plants; ensure good air circulation; water in morning; weed; destroy crop residue; rotating crops on 5-year or longer cycle may help |
If boiling cabbage, drop walnuts (shell on) into the water; they will absorb the cabbage’s unpleasant odor.
Catherine Boeckmann


ADVERTISEMENT
This is attractive & good idea growing and harvesting about cabbage I am following it to grow.
Very informative
Thank you
Love that
what is the price of it?😁
Very informative article
Is it possible to plant the crop during the rainy season? If so how do i aid the soil to avoid water clogging?
I appreciate in all the growing tips and maintenance of cabbage
See this helpful article on how to preserve cabbage. And here’s our Almanac recipe on making sauerkraut!
Hi,
I want to know if there is a device that will measure the hrs of sunlight on certain areas of my yard. I do have a lot of trees and several different planting areas I want to make sure I'm choosing the correct locations for certain vegetables. Since we can grow cabbages all year long ( I didnt know that)could they be grown in the same spot as last grown cabbages?
If you have an iPhone there is an app that will show you how the sun tracks in your garden
What is name of app?