
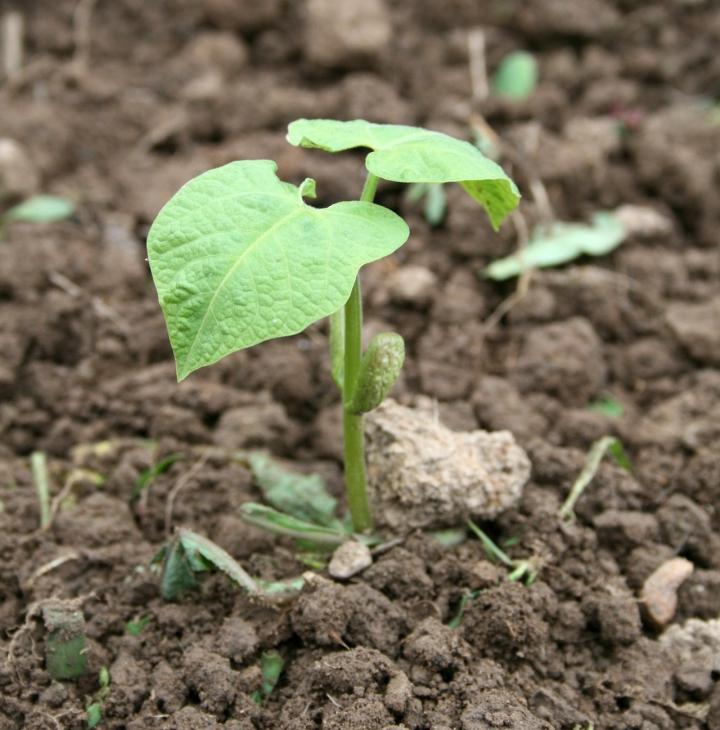
How to Direct-Sow Seeds Outdoors
Most vegetables are started from seed sown directly in the garden, especially in the fall when the soil is already warm. Learn how to direct-sow vegetable seeds so that they survive and thrive.
Starting Your Vegetable Garden
When it comes to growing vegetables at home, you have two options for getting your garden started: you can start vegetables from seed (indoors or outdoors in the garden) or purchase small starter plants (called “transplants”) from a local garden center. Many gardeners use a mix of these techniques in their vegetable gardens each year.
Which method is best? It depends. Many vegetables prefer being directly seeded into the ground and do not thrive as well if they’re transplanted or disturbed. In this article, we focus on vegetables which are planted as seed directly into the ground outdoors. See our separate articles about transplanting and starting seeds indoors for more information on those topics.
Read Next
Of the vegetables that are planted as seed directly into the garden: Some are considered “cool-season” vegetables, which need a cool period to germinate, and others are “warm-season” vegetables, which need the soil to be warm enough to germinate and will not survive a frost. Here’s a helpful list:
Cool-Season Vegetables
“Cool-season” vegetables have seeds which will germinate in cool soil. They are often planted in the spring (to mature before the weather gets hot) and in the summer (to mature in the cool of autumn). Below is a list of those veggies which prefer to be seeded directly into the soil (not transplanted):
Very hardy (can be planted 4 to 6 weeks before average last frost date)
- Collards
- Endive
- Fava beans
- Kale
- Kohlrabi
- Leeks
- Lettuce
- Onions
- Peas
- Rutabagas
- Spinach
- Turnips
Hardy (can be planted 2 to 3 weeks before average last frost date)
- Beets
- Carrots
- Chard
- Mustard
- Parsnips
- Radishes
Warm-Season Vegetables
“Warm-season” veggies grow best in warm weather and seeds germinate only if the soil is warm enough. If planted too early, seed may rot in the ground. A late spring frost will kill them, as will the first autumn frost. Below is a list of those veggies which prefer to be seeded directly into the soil (not transplanted):
Tender (plant 0 to 2 weeks after frost; injured or killed by frost but tolerant of cold weather)
- Snap beans
- Dry beans
- New Zealand spinach
- Summer squash
- Sweet corn
Warm-loving (plant 2 to 4 weeks after frost; killed by frost immediately and not tolerant of cold weather)
Cucurbit seeds (which include cucumbers, muskmelons, watermelons, pumpkins, summer squash, winter squash, and gourds) require very warm soil to germinate, at least 60°F. Seeds may rot if the soil temperatures are under 60°F.
- Cucumbers
- Garbanzo beans
- Lima beans
- Melons
- Okra
- Pumpkins
- Soybeans
- Winter squash
- Yardlong Beans
Before Sowing Seeds
It goes without saying (but we’ll say it again), you can’t just scatter seeds on the ground and expect all plants to grow! Similar to a human, plants need the right environment, nourishment, and water. Here are some things to keep in mind before sowing seeds:
- Know Your Planting Dates. Before you even start planting, know when each vegetable should be planted. Consult our Planting Calendar for the best dates to plant, based on frost dates.
- Have a Plan. Know where each vegetable will go. For example, consider which vegetables need shade and which vegetables are tall so they do not shade shorter plants. Also, plant so that you can reach the center of the row or bed easily enough to weed, water, and harvest. Provide permanent beds for perennial crops such as rhubarb, asparagus, and some herbs. Remember, you can plant cool-season crops in the same place as warm-season crops later in the season, based on the vegetable’s days to maturity (on the seed packet). Try our Garden Planner to plan your garden for success.
- Prepare the Soil. Your seeds need rich, fertile soil to grow. Add organic matter in the spring and work it into the soil, digging down about 1 foot to loosen the soil. Alternatively, do as many gardeners do and add organic matter in the fall so that it needs little work in the spring. See our page on how to prepare the soil for planting.
- Remove Weeds. Before you plant any seeds, the area MUST be weed-free! Otherwise, the weeds are competition for water and nutrients.
- Apply Fertilizer. In the spring—shortly before planting—work fertilizer into the soil. A soil test will help determine soil deficiences. Learn more about how to apply fertilizers to your garden.
- Use Quality Seed. Seeds do have a shelf life, and while you can often get away with using older seeds, just be prepared for lower germination rates. Use fresh seed from a reputable company for the best results. See our list of reputable seed soures. Also, if you save you own seeds, do not save seeds from hybrid plants. Most hybrid plants will not be “true” to their parent type, so you could end up with a completely different (and possibly disappointing) fruit or flower. See more about saving vegetable seeds.
- Starting Indoors. For vegetables that grow slowly from seed, try starting seeds indoors several weeks before the planting dates. Vegetables that grow slowly from seed and are ideal to start indoors include: tomatoes, broccoli, cabbage, cauliflower, eggplant, and peppers. See our article on how to start seeds indoors.
- Prepping Warm-Season Crops. Before planting warm-season crops, especially cucurbits, you can warm the soil with different techniques, such as forming a mound or hill and/or using black plastic. To form a hill, mound soil to make a low, broad hill about 8 to 10 inches high. Lay any black plastic on the soil surface as early as possible in the spring. Simply cut a hole in the plastic in the area where you want a plant to be located; the plastic will keep the soil warmer and suppress weeds around the plant. Learn more about warming the soil.
- Protect Seedlings From Frost. If you plant in early spring, be prepared to insulate young seedlings from cold weather—from cloches to row covers. See how to protect seedlings.
How to Plant Seeds
Sowing seeds is pretty simple, but there are some tips and tricks to make it easier, including the following:
- Sow at the proper depth. In general, plant seeds at a depth two times the seed’s diameter, no deeper. However, do refer to the seed packet for this information. Some seeds only need to be pressed into the soil surface, as they need more light to germinate. For seeds at two or three times the depth, poke individual holes for seeds or create a furrow. You can use a pencil to poke holes if you wish!
- Pay attention to seed spacing. You can plant lettuce, radishes, carrots, and other small seeds densely, and then thin them to the correct spacing when the seedlings are small. In general plan to sow some extra seeds, since not all seeds may germinate.
- Plant in defined rows if you are a beginner; don’t scatter widely. It’s easier to keep weeds down between rows and identfy seedlings from weedlings. (Weeds don’t usually grow in rows!) Often, rows are spaced about a foot apart, but refer to your seed packet for specifics. See our helpful page on vegetable seedling identification.
- Firm the soil, once seeds are sown. This ensures good contact between seed and soil.
- Water new seeds gently! Don’t turn the hose on full strength and blast them or you’ll wash those seeds away or cause them to drift together. Use a fine, gentle mist to moisten the soil or let the water hose slowly trickle around the area.
- Prevent soil crusting. Weak seedlings (such as carrots) can struggle to break thrugh the soil surface if a hard crust forms. After covering seeds with soil, add a thin layer of fine mulch or compost to help prevent crusting. When you plant, you can also mix in seeds that germinate quickly (such as radishes), which will break through the crust and allow weaker seedings to grow.
- “Hill” vining plants. When direct-sowing large vining plants such as squash, melon, and cucumber, consider planting them on a hill. Each hill should be spaced 4 to 8 feet apart. Plant 4 to 6 seeds in a circle in 5-inch intervals on each hill. Thin when seedlings have 2 or 3 leaves. Remove all but 2 to 3 large, healthy, well-spaced plants per hill. More than 3 plants per hill will lead to crowding, greater chance of disease, and lower yields.
- Mark the spot where you planted your row of vegetables; it’s very easily to forget, especially when you are trying to differentiate between seedlings and weeds! Use a popsicle stick to label rows, or anything that works for you!
Caring for Seeds and Seedlings
Once seeds are sown, be sure to keep them cared for!
- Keep soil moist until the seed germinates. Watering seeds is critical. Never let the soil get dry; seedlings do not have a good root system and will dry out within hours, especially if it’s windy outside. Use drip irrigation or put the hose at ground level and let the water gently soak the planting area. Learn more about when to water vegetables.
- You’ll need to thin seedlings to the right spacing when they are a couple of inches high. Don’t be scared to thin! If you don’t, your plants won’t have space and nutrients to grow and will crowd together.
- Protect seedlings. Some pests do love those tender seedlings, too. If you have critters or pests, there are a number of different techniques to protect your seedlings, including netting, row covers, and little plant collars. See how to stay ahead of garden pests.
- Provide trellises and supports such as poles or cages. For example, cucumbers need vertical supports to produce straight (rather than curved or malformed) fruit. Any vining or sprawling plant such as melons or pole beans also need supports. Tomatoes also need supports or cages for their heavy fruit.
- Pinch back leggy plants. Many vegetables—and especially herbs—benefit from being “pinched back” after they have grown 3 sets of true leaves. Pinching back simply involves pruning the top of the plant back to its next set of leaves. This will encourage more branches so that your plant does not get leggy and grows in a more compact way.
- Continue to pamper your seedlings until they become established plants!
See our Growing Guide Library for plant care tips for all your common vegetables.
If you have grown any seeds indoors, you’ll need to transplant into the soil. See how to transplant.
Free Online Gardening Guides
We’ve gathered all of our best beginner gardening guides into a step-by-step series designed to help you learn how to garden! Visit our complete Gardening for Everyone hub, where you’ll find a series of guides—all free! From selecting the right gardening spot to choosing the best vegetables to grow, our Almanac gardening experts are excited to teach gardening to everyone—whether it’s your 1st or 40th garden.
Catherine Boeckmann

Getting Started
Planning For a Garden
Planting a Garden
Plant Growing and Care
Harvesting and Storing Vegetables


ADVERTISEMENT