
Water-bath canning is perfect for making jams, jellies and preserves!
Introduction to Water-Bath Canning at Home
If you’d like to make fruit jam, jelly, pickles, or other pickled vegetables, you can lock in that peak of taste and freshness for up to a year simply by briefing boiling your jars in water. This is called “water-bath canning.” Learn how to water-bath can—and find delicious recipes!
Note: Sometimes, Water-Bath Canning is called “Hot Water Canning” or “Boiling Water Bath.” It’s all the same. The other type of canning is called pressure canning).
To can your produce safely, you need to know how to sterilize jars effectively and create the perfect seal, how to store your delicious canned creations safely, and what to do if your jars fail to seal properly.
Read Next
In this guide, we’ll take you through the full canning process step-by-step. Also, here is an excellent video, which really helps to see a demonstration.
Why Water-Bath Canning?
Water-bath canning is only for produce that is HIGH in acid. We’re talking about tomatoes, berries, fruit, sauerkraut, and pickled vegetables. This means water-bath canning is for making jams, jellies, and pickled veggies. Their natural acidity—in addition to time in a boiling water bath—helps preserve them safely without the use of high pressure, although you’ll still need to take some precautions.
Water-bath canning is NOT for meats, seafood, poultry, chili and beans, corn, and other low-acid vegetables that require a higher temperature (240°F) to raise the heat inside the jars above the boiling point of water (212°F) and hot enough to kill harmful bacteria. Low-acid food requires pressure canning.
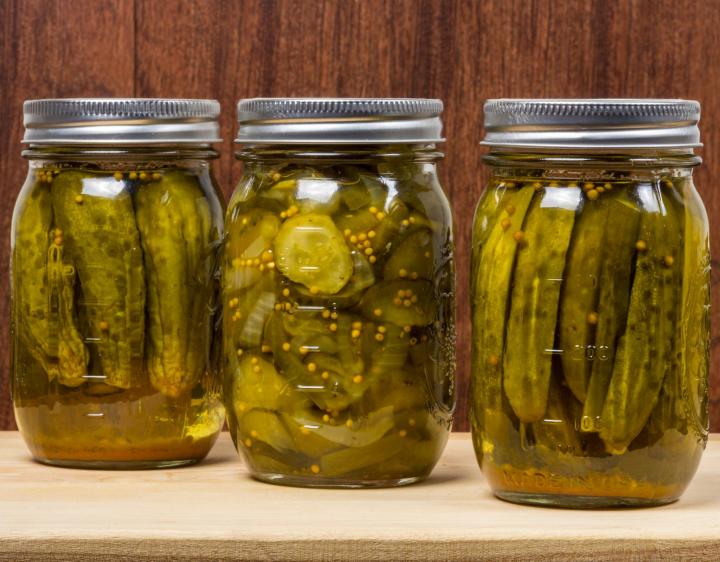
Photo Credit: Zigzag Mountain Art/Shutterstock.
What Canning Supplies Do You Need?
If you’re starting out, you’ll need to assemble some gear. Although you can cut expenses in some ways, food safety concerns should dictate all of your choices.
- A boiling water canner is a large deep pot usually made of aluminum. They have fitted lids and are deep enough so that you can completely submerge the jars, leaving at least 1 inch above their tops. Flat bottoms are best (to work on all cooktops). You don’t have to have a boiling water canner, but any stockpot needs to work similarly.
- Also essential is a rack that fits inside the canner to keep your jars elevated above the direct heat at the bottom of the stockpot. Don’t allow jars to sit directly on the bottom of your canner because they will crack from the heat.
- Canning jars—usually by Mason, Ball, or Kerr brands—come in many sizes, from four-ounce, to half-pints, pints, three-quarter quarts, and quarts, in both narrow- and wide-mouth versions. You can always reuse your jars. (Note: Even if you have access to hundreds of ornamental glass storage jars, recycled pickle, and mayonnaise, or the old-fashioned canning jars with wire bails and glass lids that are sealed with jar rubbers, do NOT use them for canning.)
- Clean, rust-free, undented metal bands that fit your jars. These screw onto the threaded rims of the jars, holding the lids in place until the products are processed, sealed, and cooled. You can reuse your bands if they aren’t dented or damaged.
- Single-use metal canning lids that fit your jars. You must use brand-new lids every time you process food. These lids are designed with an inner gasket that softens during processing (heating in the canner), allowing air to escape from the jar during cooling and forming an airtight seal as the jars cool.
- A canning funnel. Ideally stainless steel or plastic, this wide-mouthed funnel keeps food from spilling onto the rim of the jar while you’re filling it.
- A stainless-steel ladle. You may already have a nice soup ladle that will work well for filling canning jars, but if you’re buying a new one, go for a long-handled model with a pouring spout or rim.
- A jar lifter. These are specialized tongs that fit around the base of the canning-jar rims to safely grasp and lift hot jars straight up and out of the canner after processing or to lower them into a canner of boiling water.
- A food mill or strainer. There are many styles and sizes of these devices, designed for mashing soft, cooked foods, and sieving them to remove skins and seeds from the pulp. I’m still using an old hand-cranked Foley Food Mill inherited from my mom, though I also have a modern, heavy-duty food mill that clamps to the countertop and that came with several different-sized screens. I rarely pull it out; in the flurry of summer gardening, harvesting, and preserving, it takes too long to assemble and clean. The old Foley hangs from a hook, ready to go. Plus, it’s reliable (although it takes a little muscle power) and is easy to clean.
- A stainless-steel stockpot large enough to hold and cook a big batch of tomatoes, berries, or other products before you ladle them into the canning jars for processing in the canner.
Use The Right Cooking Surface
Do your water-bath canning on an electric or gas stovetop. No matter what you’ve heard or how cool it sounds, it’s not safe to can in an oven, microwave, or dishwasher. It’s also not safe to can tomatoes and fruit products by simply sterilizing the jars and lids by boiling them in water and then ladling a boiling-hot product into the jars, and sealing them by placing a lid and screw band on. Even if the jars seal well and hold their seal, their contents HAVE NOT been heated adequately to prevent bacteria, toxins, mold, and yeast from growing when the jars are stored at room temperature.
Although some of the new multi-cookers come with a canning feature, the U.S. Department of Agriculture (USDA) says research warns that ALL of these devices are NOT SAFE for home canning, even for high-acid foods.
Smooth glass stovetops pose another concern for home canners. Some styles of water-bath canners have indented bottoms that prevent heat from the glass top from being adequately distributed during processing, and much of the heat may be reflected from the canner back to the glass, causing the glass to overheat. This may cause the glass to crack or activate the burner’s shut-off feature, resulting in an under-processed canner load.
If you have a smooth, glass cooking surface, the USDA says your best bet is to follow your stove manufacturer’s advice, “because styles of smooth cooktops being manufactured differ in ways that influence suitability for canning”.
Water-Bath Canning Step-by-Step Guide
Here’s the step-by-step process for canning produce using a water bath. Follow the steps precisely!
In advance: Have your supplies and produce on hand. All jars, lids, and bands should be clean, either washed in a dishwasher or washed in hot water with soap. Make sure your bands fit. Also, there shouldn’t be any nicks or cracks on the rim of the jars or the jar itself. Lids should be brand-new every time (as discussed above).
- Your jars need to be hot prior to being filled with hot ingredients and placed in a hot canner. Put the clean jars in a separate large pot (not the canner), cover with water (fully immersed), and boil the water for 10 minutes. Note: The bands and lids do not need to be heated. Lids on the market today no longer need the seal to be heat-activated if they are new and clean.
- Separately, heat the water-bath canning pot. Fill halfway full with water. Turn on the heat and let the water simmer (180°F). If you have a jar rack, hang it inside the canning pot. Keep the water simmering on your stovetop until Step 8, below, when you have filled each jar with the prepared food, and put the jars immediately into the canner.
- Remove and dry the jars. Then, while they’re still heated, fill the jars with the prepared recipe. Use a wide-mouth funnel, and ladle the food into the jar. Leave a ¼- or 1/2-inch headspace at the top.
- Gently use a clean spatula or plastic canning wand to swirl along the inside of the jar to release trapped air bubbles.
- Wipe the rims of jars with a clean, damp cloth and remove any food residue. Put the lid on each jar and then apply the band. Screw the jar until finger-tight but not too tight.
- Using the jar lifter, put sealed jars in the canner on the rack. Don’t allow the jars to touch each other. Jars must be covered by water—about 1 to 2 inches of water. Add more hot water from a separate kettle, if needed.
- Turn up the heat to get water in canner to boil. Start timer when water starts boiling. Every recipe is different, but you’ll usually boil the filled jars for about 10 minutes.
- Once finished, shut off the heat and remove the canner lid, allowing steam to escape away from you. Let jars rest in the canner for 5 to 10 minutes.
- Remove jars using the jar lifter from canner and stand on a towel or rack, not touching. As they cool, you should hear the jars “ping” which means the jars have properly sealed.
- Leave jars undisturbed for 12 to 24 hours to cool. DO NOT retighten bands, as this may interfere with the sealing process.
- After the jars are completely cool, double-check the seals. Unscrew the bands and press down gently on the center of each lid. If you don’t feel any give, the jar has properly sealed. If the lid springs back up, the lid doesn’t seal, so put the jar in the fridge and eat within 2 weeks.
Store jars in a cool, dry, dark place for up to 1 year as recommended by National Center for Home Food Preservation. When you open the jars: If anything looks or smells odd or lid is broken, do not eat.
Water-Bath Canning Recipes
Now that you’ve got the supplies and knowledge you need to get started check out some recipes!
- Crushed Tomatoes
- Strawberry Jam
- Crunchy Dill Pickles
- Bread and Butter Pickle
- Pickled Green Beans
- Zucchini Marmalade
For more canning information, consult the USDA’s Complete Guide to Home Canning.
The Almanac Canning Guide was updated and fact-checked as of July 2020, by Christina Ferroli, PhD, RDN, FAND. If interested in nutrition counseling and education practice to make healthier choices—or, simply stay up-to-date on the latest food, nutrition, and health topics—visit Christina’s Facebook page here.
Margaret Boyles

Introduction to Preserving
Freezing
Making Quick Pickles
Making Quick Jams: Refrigerator or Freezer Jam
Water-Bath Canning
How to Can Tomatoes
How to Can Pickles
How to Can Jam and Jelly
Pressure Canning
Drying
Salting and Brining


ADVERTISEMENT
Hello, just a question... I just watched your water bath canning video in which a gentleman was canning green beans, however I had previously just been reading your page about pressure canning. In the pressure canning info, it says that the only way to safely preserve low acid vegetables is by pressure canning them. Green beans are listed as an example of such a vegetable. Is it actually safe to weather bath can them instead? Also the reason I was looking this up is because I came across a recipe for carmelized onion jam, which said it can't be water bath canned, it has to be pressure canned. I would think onions are high acid, so I'm not certain why this would be?
I'm a newbie at canning, so any info would be greatly appreciated! I wanted to give away some preserves as gifts this year, but really don't want to make my loved ones sick! Thanks so much, Kealey
What a wonderfully clear and full explanation in the values of water bath preserving. I've never seen one before and have often wondered about the can and cannot items. Truly grateful for this extremely helpful article. Thanks so much Ellie
We love to hear that, Ellie!
Thank you Robin for your informative article. I have been a "canner" for years, but thought I would read the article anyway. To my surprise I found another reason I declined to buy a glass top electric stove, despite the intentions of a very aggressive sales person. I had to "order" an old fashioned stove with electric burners !!! My husband was all for buying a glass top - so easy to clean - but I'd read "not good for use with cast iron"...Now I have another reason...not good for canning !!! thanks Robin...
I have a flat top glass stove, I found and use a Steam Canner, it works extremely well, require less time to heat up, like a deep water canner, still requires correct time per your altitude, also I use cast iron on my flat top, you just have to, not slam the cast iron down, works great.
We have a flat top stove surface. Haven’t tried pressure canning yet but we use only cast iron for cooking. Works great!! No scratches on the stove top.
I’d prefer a gas stove but just isn’t in the budget…
Canning at high-altitude (3000 ft and greater above sea level) requires longer processing (boiling) times, as it takes longer for the jar contents to reach the temperature needed. Consult the USDA canning guide, or Ball Blue Book of Canning, for the graph of how much extra time is needed for your altitude. Be sure to add that extra time to the low-altitude amount of time - for example, in my area at roughly 4,600 ft, if I need 10 minutes to account for the altitude, I would add that to the 10 minutes already called for in the recipe for a total processing time of 20 minutes. Everything else re. the recipe will be the same. Enjoy!