
Start Your Seeds Earlier Using Milk Jugs
We might still have snow on the ground, but that doesn’t mean we can’t be sowing seeds for our spring gardens! We’ve had great success starting seeds using the milk jug method. It couldn’t be easier! You use them as mini-greenhouses outside in winter and let nature do the rest. Here are 5 steps to winter sowing in milk jugs.

About Sowing Seeds in a Milk Jug
The milk jug sowing method is attributed to Trudi Greissle Davidoff, and her 2012 essay, “How To Winter Sow Seeds Outdoors.” It is the low-cost system of sowing hardy and half-hardy seeds into soil inside translucent plastic jugs or containers and allowing the seeds to naturally germinate through the ups and downs of the winter weather.
This method requires no expensive indoor equipment such as grow lights and it grows seedlings that naturally harden off. You simply set them outside and forget about them, even as they get snow, rain, frost, and natural winter conditions.
Read Next
Before you know it, you will have tons of baby seedlings, already acclimated to the outdoor temperatures and ready to set roots into the garden to grow, bloom and beautify your homes!
5 Steps to Plant Your Winter Sowing Milk Jugs
In terms of materials, all you need are recycled plastic milk jugs, your seeds, potting mix. Plus, you’ll need a few tools such as a utility knife or scissors, a drill or screwdriver, duct tape, and a marker for labeling.
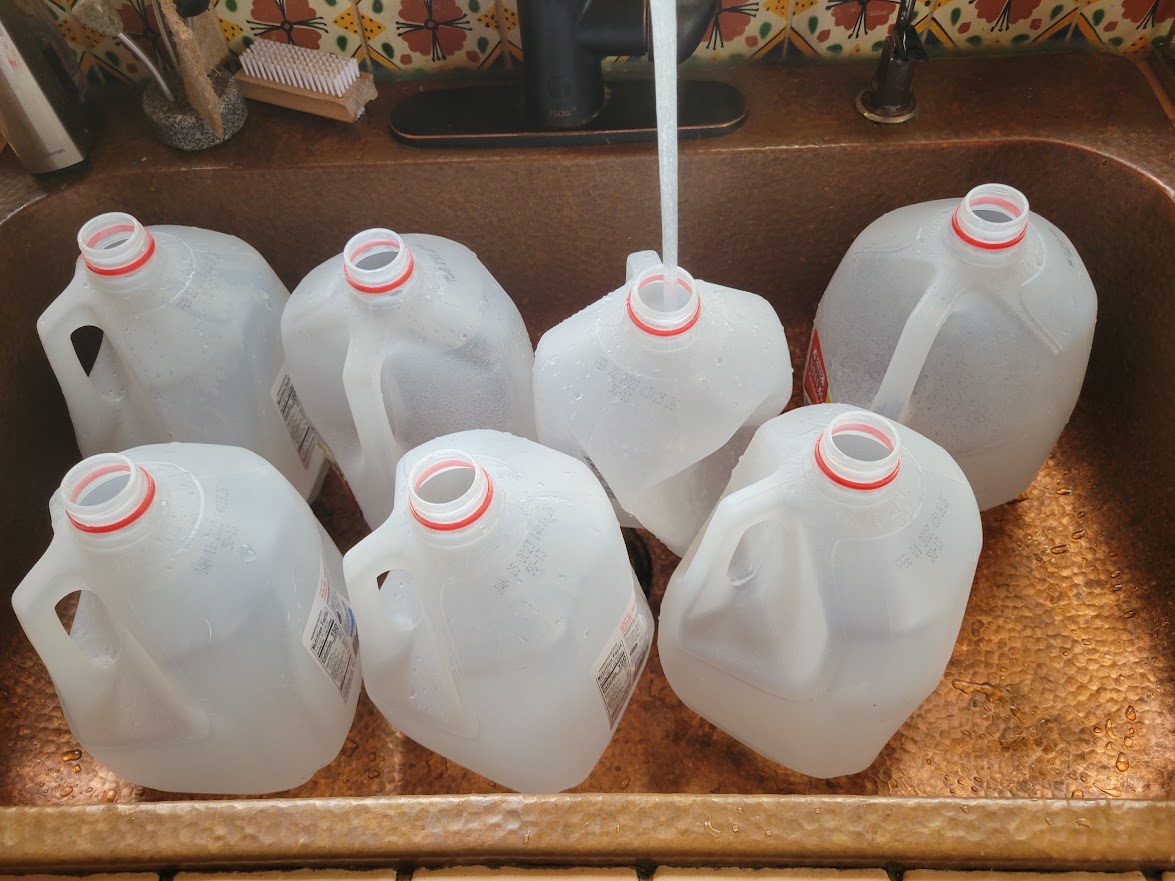
1. Collecting Milk Jugs
The main thing is to start collecting milk jugs! Once I have enough jugs saved, I remove the lids and wash them well with soap and water and just a drop of bleach. I don’t save and reuse the jugs after the season is over and so this step is really a quick clean to make sure that nothing will grow once the soil has been added and temperatures heat up. Gallon-size containers have worked best for me since I can sow more seeds at one time and the amount of soil in there holds the moisture better than just a half-gallon or smaller plastic container. But experiment for yourself. Many people have success with plastic salad containers or other clear recyclables.

2. Cut Open the Jug & Add Drainage Holes
Use scissors or a boxcutter to cut an opening underneath the handle, about 4 inches up from the bottom and a bit over ¾ of the way around the jug.
Leave about an inch of attached plastic to create a hinge that serves as a lid to keep the top and bottom connected for ease of covering up and moving the jugs about. If you are sowing a variety of seeds, having the top and bottom connected keeps the seed ID information and the seeds sown, together, eliminating any future confusion- been there, done that!
Be sure to also poke a few holes into the base of the milk jug for drainage. I use a battery-powered drill for ease. Scissors or a screwdriver can get the job done as well- just depends on how hard you want to work at it. If using a screwdriver, heat first in a flame to easily melt the holes through the base of the jug.

3. Label and Fill Base with Seed Starting Mix
Use duct tape or a similarly strong tape that you can write the name of the seeds you are sowing and the date sown. Stick to the top attached lid of the milk jug. I add on the days to germination just for my own reference. Then fill with slightly damp, soilless seed starting mix or an indoor potting soil of your choice. Just be sure there is no added fertilizer within your mix that might burn your baby seedlings.
.jpg)
4. Sow Seeds & Tape Closed
Sow your seeds on top of the soil. Pay attention to any specific seed requirements as some seeds require darkness to germinate, like Bupleurum or Delphinium. Check the back of your package for germination specifics. If necessary, sprinkle a small bit of vermiculite or thin layer of potting soil on top to cover lightly. Most hardy and half-hardy seeds are not too finicky and will often resow themselves quiet happily with the least amount of help in nature. The milk jug sowing method is basically mimicking nature and allowing the natural freeze and thaw and day-light hours to do what it does best in early winter- prepare seeds to grow!
Once seeds are sown, close down the lid of your jug. Tape a long piece of duct tape and secure around the middle to seal it closed. This creates a semi-greenhouse effect for germinating the seeds. You will need to open and vent the seedlings after they have germinated, and the spring temperatures really start to warm things up. You don’t want to fry them!

5. Tuck Into Crates & Let Nature Nurture
Once you have sown your seeds, tuck them into a crate or somewhere where they will be safe from wind but still receive good sunlight and element exposure. The natural cycle of the late winter and early spring temperatures, and snow or rain will automatically germinate your seeds and begin the process of seedling growth.

As the day temperatures begin to warm, be sure to check on your seeds and open the lids during days with temperatures of 50°F or above. Cover again at night. Once the day and night temperatures are both well above freezing, you can leave the lid off entirely. If the soil feels dry to the touch, lightly water. Most importantly, be curious and watch them. The elation of returning to the jugs after a long winter and seeing tiny, green, sprouting’s appear is pure joy! Now, all you need to do is nurture them with a careful eye.
When they have 2 or 3 true sets of leaves and you are able to work your soil, you can plant your already hardened-off seedlings directly into pots or the garden to enjoy.

Which Seeds Can You Sow in Milk Jugs?
Hardy Annual Flowers
These seeds are hardy enough to survive the cold temperatures of a Northeast winter. The following list of hardy annuals are some of my favorites that I continually sow and grow in our Northeast climate. After the early spring bulbs, these beauties are the early blooming backbone of our farm.
- Bells of Ireland-Moluccella laevis
- Bupleurum-Bupleureum griffithii
- Bachelor’s Button-Centaurea cyanus
- Delphinium-Delphinium x belladonna
- Feverfew-Tanacetum parthenium
- Nigella-Love-In-a-Mist
- Poppy-Papaver nudicaule
- Rudbeckia- Rudbeckia hirta
- Snapdragon-Antirrhinum majus
- Yarrow-Achillea millefolium
Hardy Annual Vegetables
Of the vegetables, cold-weather brassicas are generally the first veggie to sow as many can be started 6 to 8 weeks before the first spring frost. This is generally in February or March for many regions. See your frost dates.
Cold-weather greens such as chard and lettuce can also be started in milk jugs by early March.
It’s best to avoid starting seeds for vegetables that do not like being transplanted such as root crops (beets, carrots, turnips). Squash, cucumbers, and melons also aren’t fond of transplanting but you could choose to start these veggies in mid-spring (April) if you transplant with care.
When to Winter Sow
My indoor grow space under lights is full so that’s when I pull out the milk jugs and start the process of sowing seeds to place outside.
For your location, the best way to know “when” to sow in milk jugs is to look at when the seed packets say to start seeds. Here is a guide:
- “Start seeds indoors 4 to 6 weeks before average last frost”—> Sow early- to mid-winter
- “Start seeds indoors 3 to 5 weeks before average last spring frost”—> Sow in mid- to late winter
- “Direct sow outdoors after all danger of frost has passed”—> Sow in early spring
For example, brassicas are sown 6 to 8 weeks before the last frost date. If your last spring frost date falls in late April, you could sow in milk jugs in late February through early March.
→ See a planting calendar based on frost dates.
Once you try sowing seeds in milk jugs, you’ll do it every year. This is the easiest way to work with nature and get a fun jumpstart on that spring and summer garden or patio pots!
Stay curious and grow some beauty!
Melissa Spencer


ADVERTISEMENT