
Grow crisp, tasty lettuce with ease—from seed to salad bowl.
The Almanac Garden Planner - Use It Free for 7 Days!
Plan your 2025 garden with our award-winning Garden Planner.
Planting
Lettuce prefers a location with 5 to 6 hours of sun, but can benefit from afternoon shade when temperatures soar. Soil should be loose, well-draining, and moist but not soggy. In the weeks prior to planting, amend with plenty of compost for added fertility.
Or grow lettuces in pots or tubs of potting soil. Lettuce prefers a bright, open position with good air circulation to promote strong, disease-free growth.
Lettuce is a cool-season crop, so in hot climates, you may get better results growing it in a cooler, shadier spot, especially as the young plants start out. Either way, lettuces don’t take long to reach maturity, which makes them an excellent choice for growing in between slower-to-establish crops such as corn or leeks.
When to Plant Lettuce
Direct sowing is recommended for this cool-season crop, whether planted in spring or fall. See our Planting Calendar for planting dates.
Spring Crop:
- Direct-seed outdoors: 2 to 4 weeks before the last spring frost date. Soil temperatures between 45°F and 65°F (7°C and 18°C) are ideal. Make sure you stagger planting by a couple weeks if you don’t want to eat all that lettuce at once!
- Start seeds indoors: 6 to 8 weeks before the last frost.
- Transplant seedlings: 3 to 4 weeks before the last spring frost. Transplants can go out even earlier than direct seeding, especially if they’ve been hardened off properly for about 3 days.
Fall Crop:
- Direct-seed outdoors: 6 to 8 weeks before the first fall frost. Lettuce grows best in cooler temperatures; some varieties can tolerate light frost. Fall crops often taste sweeter due to the cooler nights.

How to Plant Lettuce
- Sowings may be made directly into prepared soil or into module trays of multipurpose potting soil. To sow directly, remove any weeds, then rake the soil level to a fine, crumbly texture. Mark out shallow drills, 8 to 12 inches or 20 to 30cm apart, using a string line as a guide if this helps. Then, sow the tiny seeds in clusters—a pinch of seeds every four inches or 10cm. Backfill the seed drills, label with the variety and water.
- Since the seed is so small, a well-tilled seedbed is essential. Stones and large clods of dirt will inhibit germination.
- Plant seeds 1/8 to 1/4 of an inch deep. Lettuce seeds need light to germinate, so don’t sow them too deep.
- Seeds may be sown in single rows or broadcast for wide-row planting (loose-leaf varieties are best for this). When broadcasting, thin 1- to 2-inch tall seedlings for the proper spacing.
- Spacing between plants depends on the variety:
- Loose-leaf lettuce: Plant or thin to 4 inches apart.
- Romaine (cos) and butterhead (loose-head, Bibb, Boston) lettuce: Plant or thin to 8 inches apart.
- Crisphead (iceberg) lettuce: Plant or thin to 16 inches apart.
- Set rows of lettuce 12 to 15 inches apart.
- Sow additional seeds every 2 weeks for a continuous harvest.
- Consider planting rows of chives or garlic between your lettuce to control aphids. They act as “barrier plants” for the lettuce.
- Water thoroughly with a mist nozzle at the time of transplanting or seeding.
For a fall crop, cool the soil in August by moistening it and covering it with a bale of straw. One week later, the soil under the bale should be a few degrees cooler than the rest of the garden and ready to be sown with a 2-foot row of lettuce. Repeat the process every couple of weeks by rotating the straw bale around the garden. As autumn temperatures decline, seed as usual for a fall harvest.
Growing
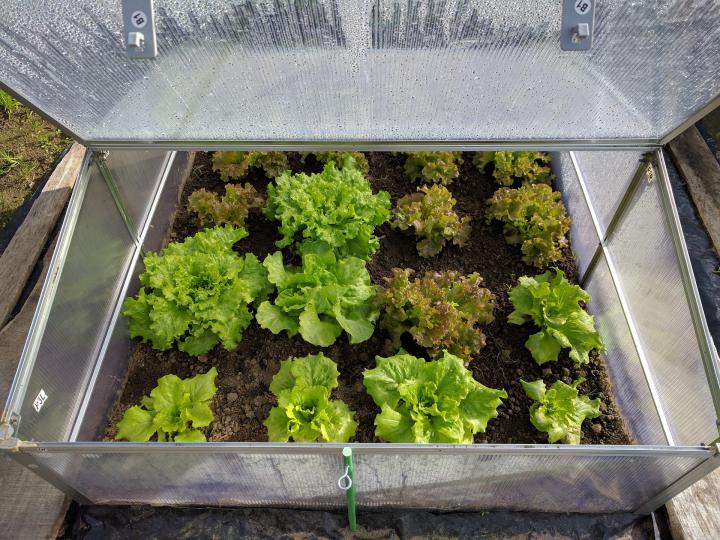
You can help transplants along at the start of the season by covering them with a temporary cloche made from bottomless milk cartons or plastic bottles. These will keep the chill off your seedlings just enough to help them acclimatize. Newly planted lettuces may also be helped with a simple row cover or fleece.
- Fertilize 3 weeks after transplanting with organic alfalfa meal or another slow-release fertilizer to provide a steady stream of nitrogen.
- Make sure the soil remains moist but not overly wet. It should drain well. Overwatering leads to disease or soft growth.
- Lettuce will tell you when it needs water. Just look at it. If the leaves are wilting, sprinkle them anytime, even in the heat of the day, to cool them off and slow down the transpiration rate. Using row covers can also help to keep lettuce from drying out in the sun.
- An organic mulch will help conserve moisture, suppress weeds, and keep soil temperatures cool throughout the warmer months.
- Weed by hand if necessary, but be careful of damaging your lettuce plants’ shallow roots.
Growing Lettuce in Containers
When you grow salad greens in containers, it can be different every day, as there are dozens of lettuce varieties along with other leafy edibles. What’s more, greens can grow in as little as 6 inches of soil! Some greens can be harvested in as little as a month’s time, and cut-and-come-again plants keep producing, often for weeks! In fact, the hardest part of “salad bowl gardening” may be deciding what to grow.
Choose a container that is 6 to 12 inches deep; a diameter of 18 inches is recommended. (Greater depth allows more room for roots and keeps the soil from drying out.) Moisten (do not soak) a portion of good-quality potting mix that is enough to fill your container to within an inch of the top. Direct-sow seeds densely—about 1⁄2 inch apart—on the prepared mix. Then cover with about 1⁄4 inch of dry potting mix, sprinkling it around. Tamp, or press, the seeds gently (a flat surface is recommended) so that they make contact with the soil and to keep them from blowing away. Water gently (a handheld pump container is advised instead of a hose, the water force from which can displace the cover soil and seeds). Keep the seedbed moist. (You can assess the wetness of the container by lifting it, as it will be lighter when dry.)
When seedlings are 4 to 6 inches tall, apply a balanced fertilizer at half strength. Continue watering as needed. Apply diluted fertilizer every 2 weeks, or per package directions. Protect greens from afternoon sun, if necessary and especially in summer, with shade cloth or row cover or by moving containers into shade. Plant more seeds in other containers every 2 to 4 weeks to maintain a fresh crop.
How to Delay Bolting
- Bolting is a common problem caused by warm temperatures (over 70°F/20°C) or changes in day length. When a lettuce plant bolts, it starts to produce a central stem and seed stalk, and leaves take on a bitter flavor.
- To delay bolting, cover plants with a shade cloth so that they get filtered light. Be sure to maintain watering throughout the warmest parts of the growing season, too.
- Planning your garden so that lettuce will be in the shade of taller plants, such as tomatoes or sweet corn, may reduce bolting in the heat of the summer.
Types
Some of our favorite varieties include:
- Crisphead: ‘Great Lakes’, ‘Ithaca’, ‘King Crown’, ‘Mission’, ‘Summertime’
- Romaine (Cos)/Butterhead: ‘Burpee Bibb’, ‘Cosmo Savoy’, ‘Green Towers’, ‘Little Gem’, ‘Paris White Cos’, ‘Parris Island’, ‘Valmaine’
- Loose-Leaf: ‘Black Seeded Simpson’, ‘Green Ice’, ‘Ibis’, ‘Lollo Rossa’, ‘Oak Leaf’, ‘Prizehead’, ‘Salad Bowl’, ‘Slobolt’
- Red Leaf: ‘New Red Fire’, ‘Red Sails’, ‘Ruby Red’ (Not recommended for hot weather areas; the red pigment absorbs more heat.)
…But there are so many more types of lettuce to explore! What are your favorites?

Cooking Notes
Lettuce makes the perfect base for any number of salads. Try these eight great salad recipes with your harvest!
Catherine Boeckmann


ADVERTISEMENT
I have found storing lettuce and celery in tin foil is way, way better than any other method for storage
May I know who is the author of the article in lettuce?
I have grow lights for the first time and was wondering if I could successfully grow lettuce now, inside. It is February 5 here in CT. Thanks.
Yes you can. I am located in southwestern Ontario and grow lettuce and herbs year round under grow lights. Just incorporate an oscillating fan on very low to blow over the plants for about 30-40 mins each day
Thank you. I’ll try it!
I bought transplant lettuce at the grocery store (established plants, ready to plant). They did well after I planted them in the planters, and doubled their growth. So, I decided to harvest it. But, I cut almost all of the leaves, including the ones in the center. Did I kill my lettuce plants or will they regrow? We live in an area in Europe where the weather is between 40’s, for lows, and 50’s for highs all day....Thank you for your insight!
It depends how you harvested. If you cut off all the leaves with scissor at soil level, it will grow back in a few weeks. You may even get a third cutting. This “cut and come again” method is actually our preferred way to go. Obviously, if you pulled the whole head or any of the roots, that’s it! Seed more lettuce.
Everyone has been telling me that Lettuce should be harvested before maturity otherwise it will bolt/ go bitter.
But how do i make out 'before maturity' stage?
is there a rule of thumb, or a day calculation, or size calculation or some signs in leaves etc. to tell me that this is ripe for harvesting but its not yet mature?
You can start harvesting baby greens when they are 4 to 6 inches in height (about 25-40 days from planting). When you top harvesting is a judgemental call. The leaves will taste bitter and the plant will look weak and no longer be producing leaves.
How you harvest is up to you. You can use scissors and cut your lettuce off at the soil. And then the plants will produce new leaves from the base and can be harvested a seconod time in 3 to 4 weeks. Or you can plant so that each head is 4 to 6 inches apart and harvest outer leaves or entire plants.
Lettuce is healthier than you realize. It also provides Vitamin-A and Vitamin-K. It also has small amount of many other healthy nutrients. It is low in fiber and it has high water content.